Angular Routing and Navigation
Table of contents
- Working with Angular Routing and Navigation
- Angular Routing and Navigation
- Let’s create below Angular Single Page Application (SPA) with Routing and Navigation feature:
- 1.Angular Routing Application setup steps
- 2 Wildcard Route and Redirecting Routes (Dealing with unavailable-non-configured route [Page not found])
- 3 Route Parameters
- 4 paramMap Observable
- 5 Optional Route Parameters
- 6 Relative Navigation
- 7 Child Routes
- Angular Router Tutorial
Working with Angular Routing and Navigation
Navigating from one page to another page in a web application is known as Routing. Routing in Angular is called Angular Routing.
- Run command:
npm installto install project/app dependencies(node_modules) - To Build and run Angular App, command:
ng serve / npm startORng serve -oORng serve --open - To change port from 4200 to other port - type command:
ng serve --port 5000 - To check the application in browser type path/url:
localhost:4200 / 5000
Angular Routing and Navigation
- The
Angular Router enables navigation from one view (component)to the another/next as users perform tasks, views ( component) - Routing simply means navigating between different view (component)
- RouterModule
- RouterModule helps to
create routes, which allows us to move from one part of the application to another part or from one view to another - A separate NgModule/Angular Module that provides the necessary service providers and directives for navigating through application views
- RouterModule helps to
- Router
- The Angular Router is an
optional service that presents a particular component viewfor a given URL, it is not part of the Angular core - The Angular Router enables navigation from one view to the another as users perform application tasks/actions
- The Angular Router is an
- router-outlet
- The directive
(<router-outlet>)that marks where the router displays a view (a container to hold different views/components loaded as users perform application tasks/actions)
- The directive
- routerLink
- The attribute/directive for binding a clickable HTML element to a route which denotes link/view name to load/show in
(<router-outlet>)
- The attribute/directive for binding a clickable HTML element to a route which denotes link/view name to load/show in
Let’s create below Angular Single Page Application (SPA) with Routing and Navigation feature:
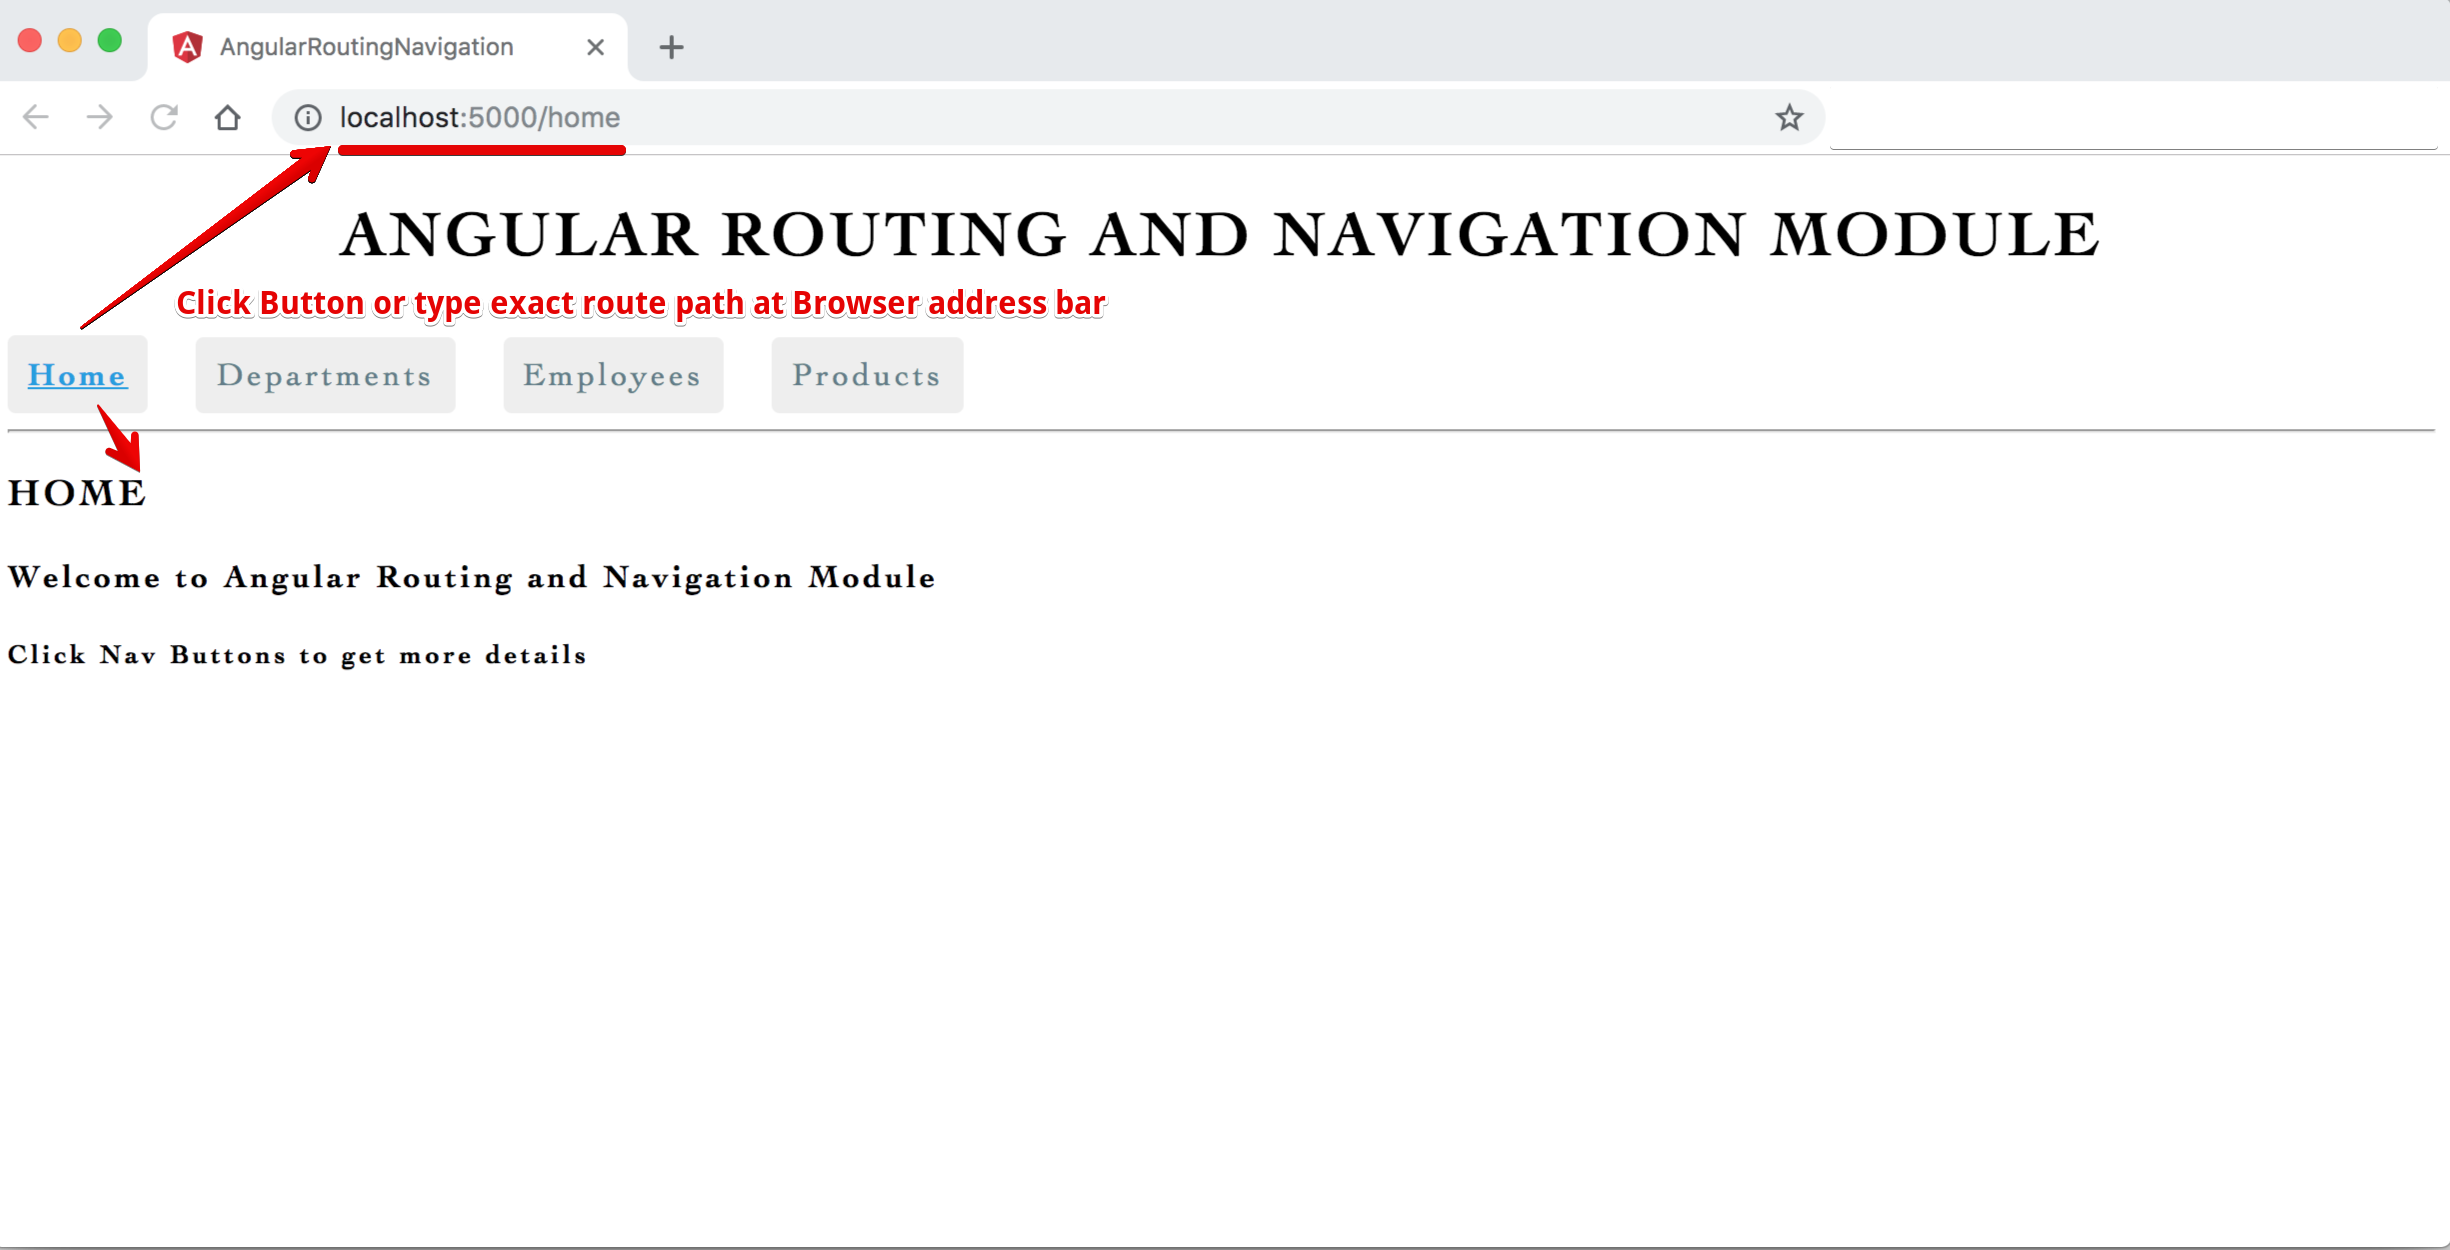
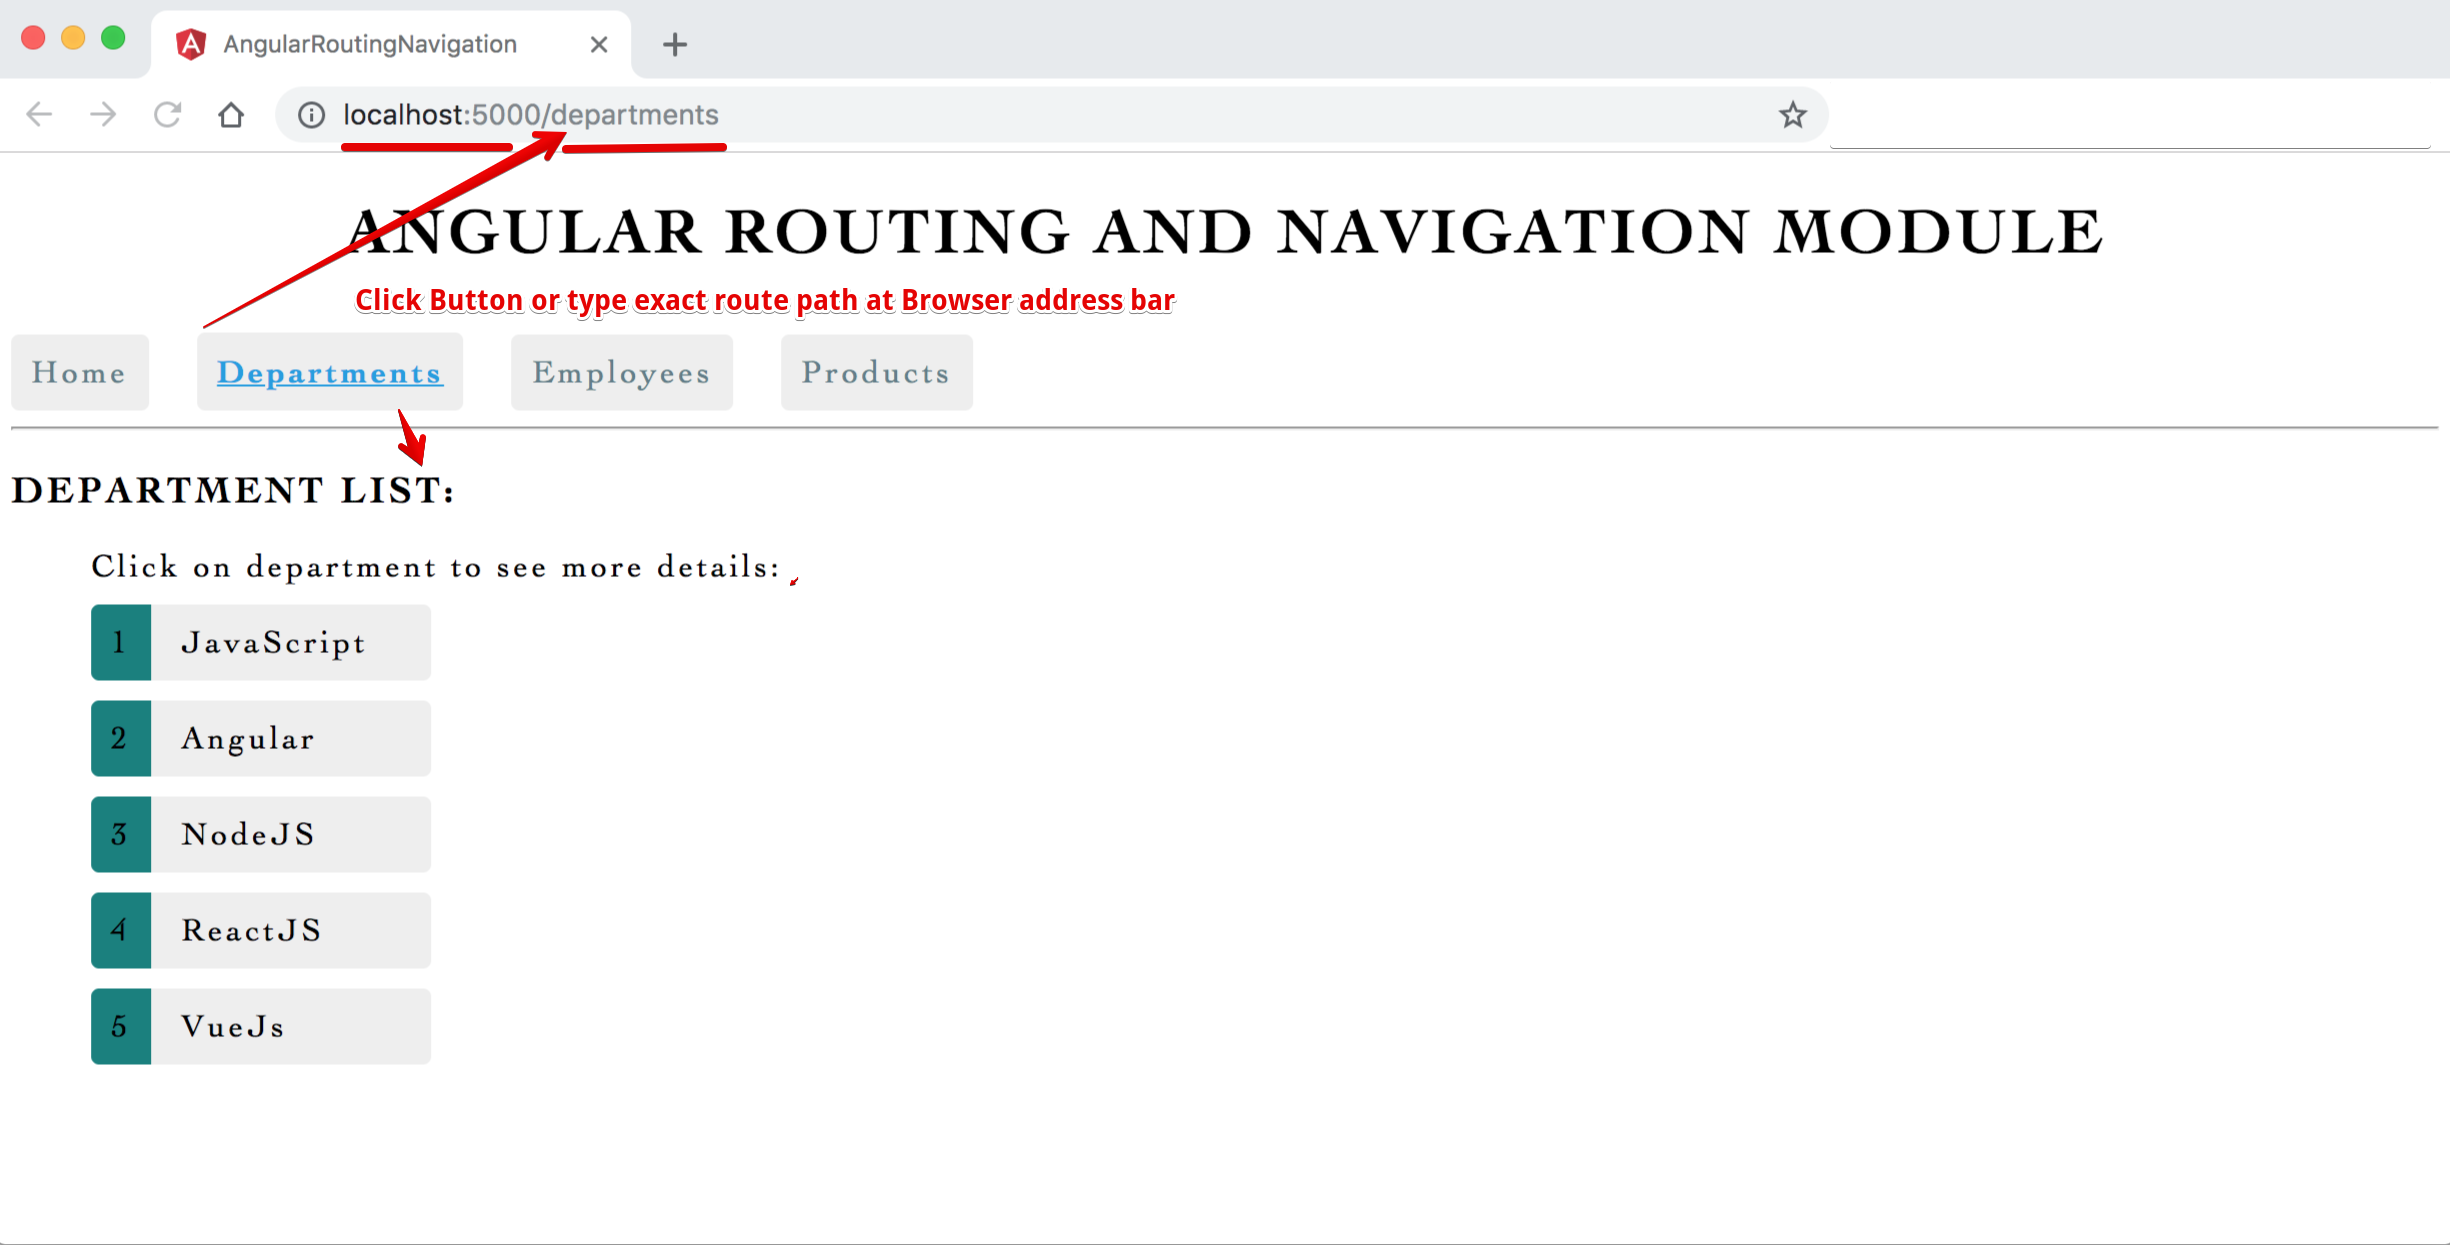
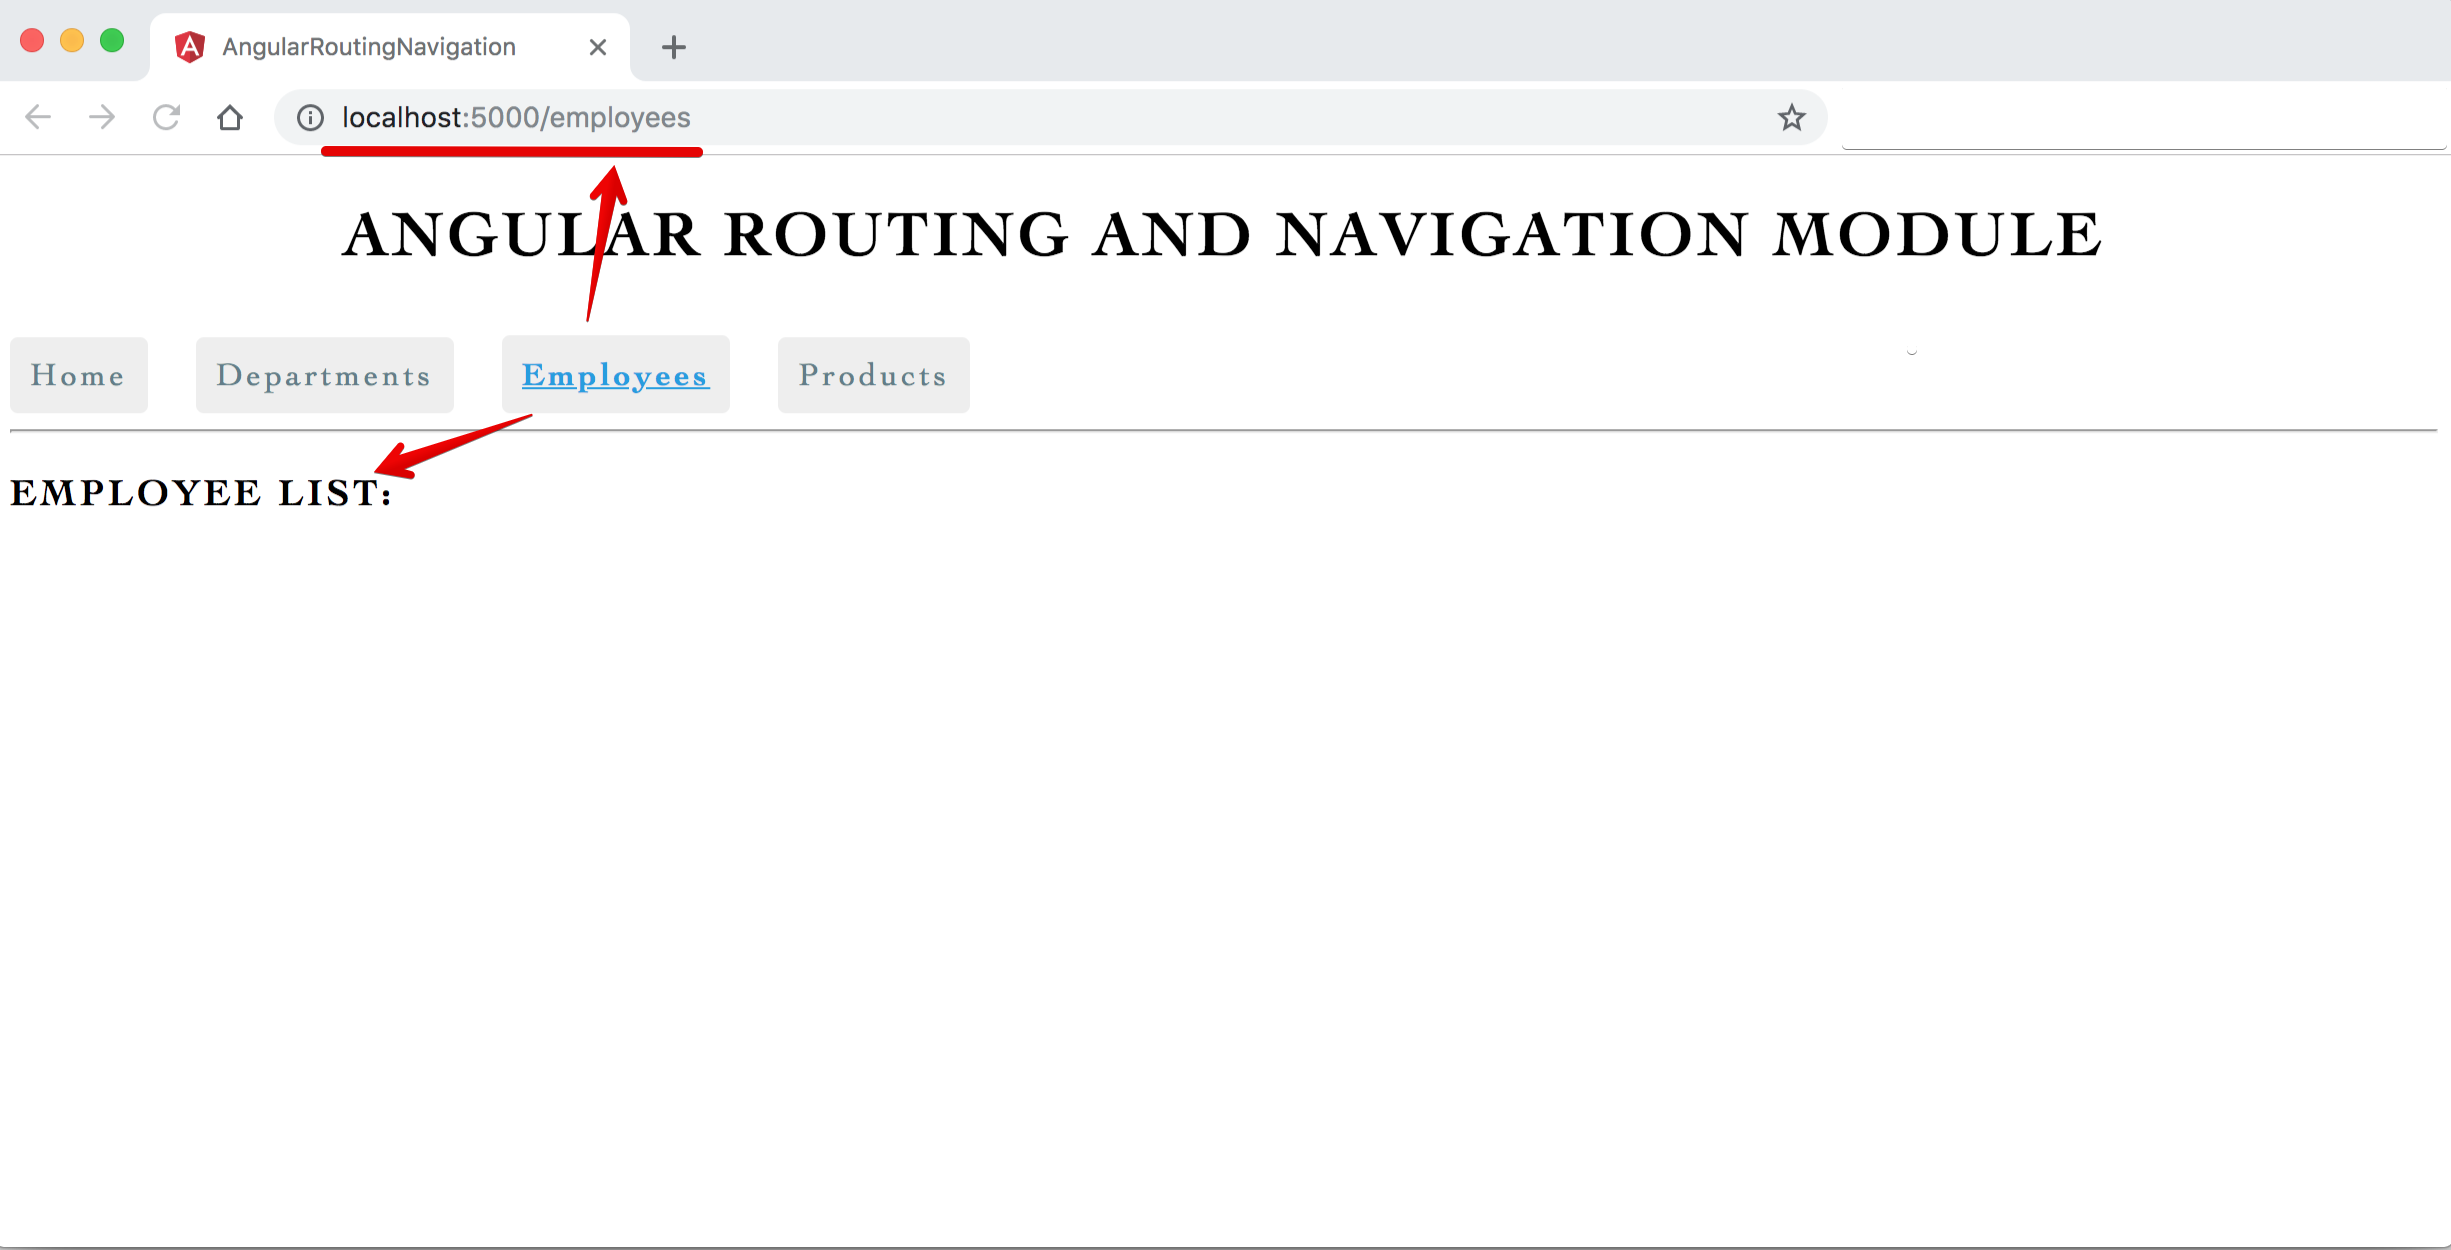
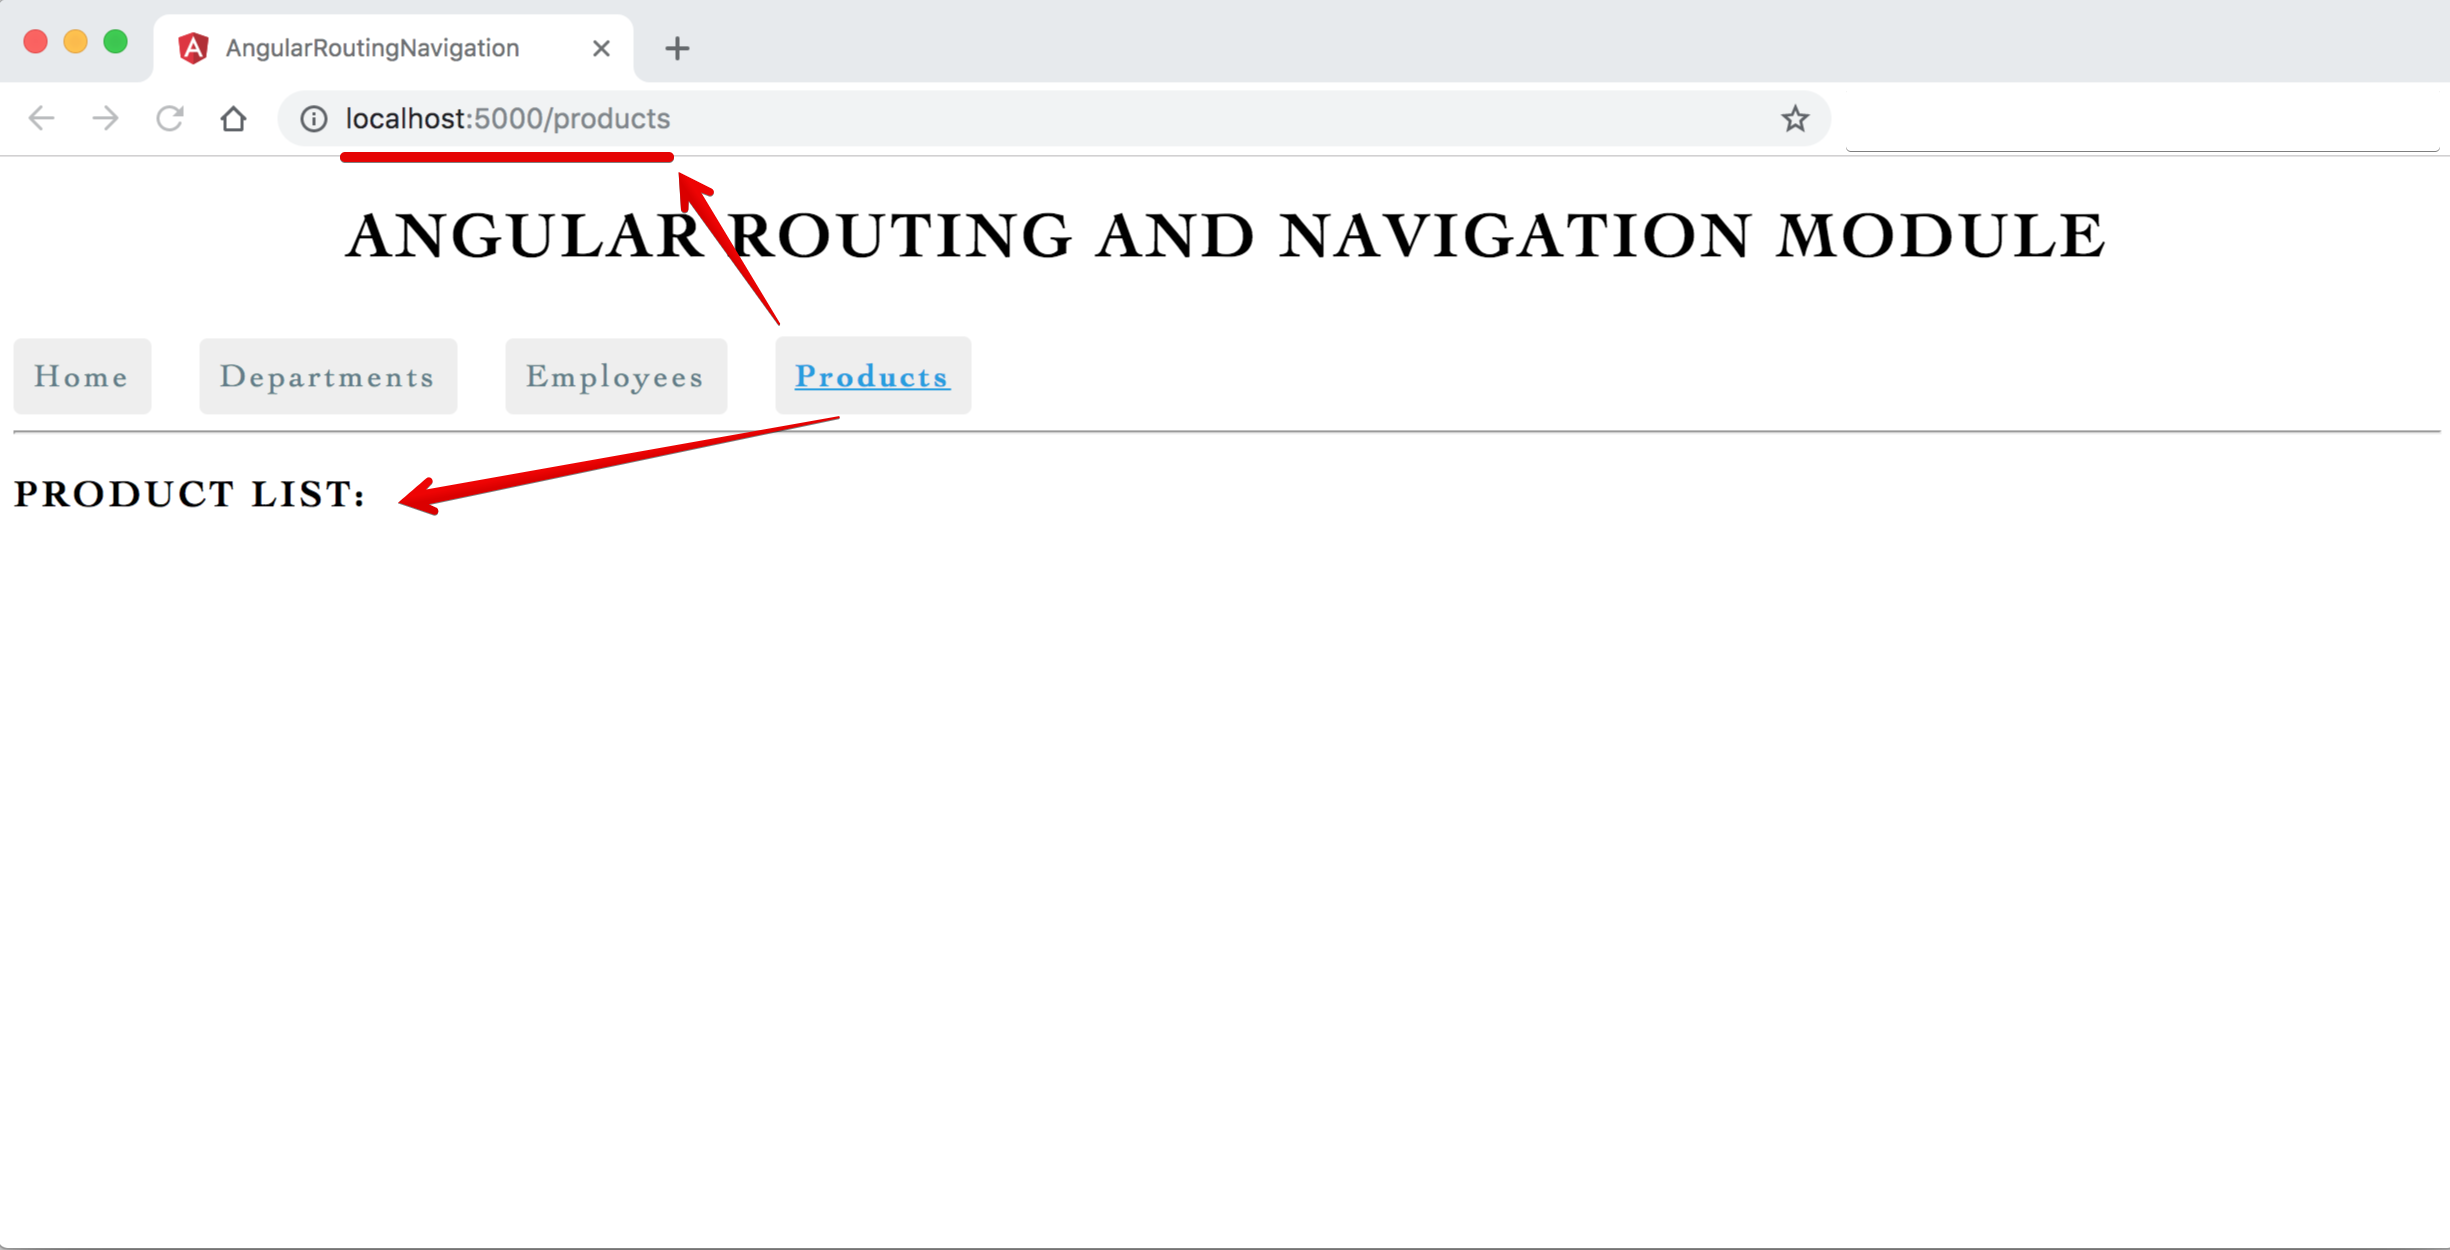
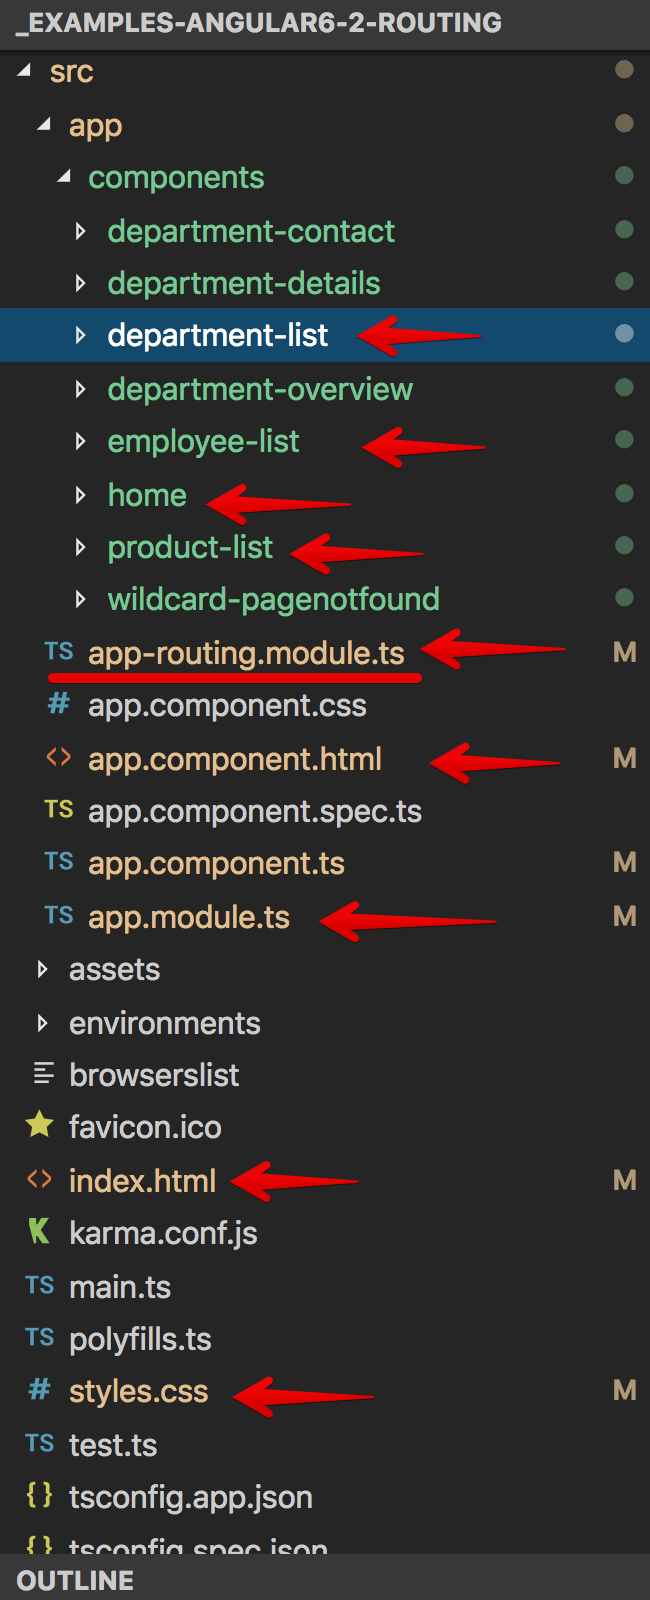
1.Angular Routing Application setup steps
- Generate a new Angular project/app with routing option
- Generate departmentList and employeeList, and other required components if any
- Configure the Routes
- Add buttons and use a directive to navigate
1.1. Generate a new Angular project/app with routing option
-
Command to create an Angular app with routing:
ng new routing-demo-app --routing -
Creating a routing module manually in any existing application:
- In index.html file under
<head> tagadd<base href="/">(It helps application to build/generate/constructs URL/view to load properly) - In the app, folder create
app-routing.module.tsfile (contains RoutingModule/Routes for application - enter a required path and components details) - import app-routing.module.ts file in
app.module.tsfile also add in the imports array
- In index.html file under
1.2. Generate required components if any (departmentList and employeeList, and other)
- Angular CLI command to generate component:
ng g c employee-list -it -is(Inline Template / Inline style) - Angular CLI command to generate component:
ng g c department-list -it -isand other required components if any
1.3. Configure the Routes
- In
app.component.htmladd tag/directive:<router-outlet> </router-outlet> - In the app-routing.module.ts file, enter required paths and component details to navigate
1.4. Add buttons and use directive to navigate
- In
app.component.htmladd links/buttons:<a routerLink="/home" routerLinkActive="active">Home</a> - We can also use
<a routerLink="/home" routerLinkActive="active" routerLinkActiveOptions="{exact:true}">Home</a>to make current exact link active
Syntax & Example: index.html
<!doctype html>
<html lang="en">

<head>
  <meta charset="utf-8">
  <title>AngularRoutingNavigation</title>
  <base href="/">

  <meta name="viewport" content="width=device-width, initial-scale=1">
  <link rel="icon" type="image/x-icon" href="favicon.ico">
</head>

<body>
<app-root></app-root>
</body>

</html>
Syntax & Example: app-routing.module.ts
import {NgModule} from '@angular/core';
import {Routes, RouterModule} from '@angular/router';

import {DepartmentListComponent} from './components/department-list/department-list.component';
import {EmployeeListComponent} from './components/employee-list/employee-list.component';
import {HomeComponent} from './components/home/home.component';
import {ProductListComponent} from './components/product-list/product-list.component';

const routes: Routes = [
  // default path
  // { path: '', component:DepartmentListComponent},
  {path: 'home', component: HomeComponent},
  {path: 'departments', component: DepartmentListComponent},
  {path: 'employees', component: EmployeeListComponent},
  {path: 'products', component: ProductListComponent},
];

@NgModule({
  imports: [RouterModule.forRoot(routes)],
  exports: [RouterModule]
})
export class AppRoutingModule {
}

// to store all routing component and avoid importing/writing duplicate list of components in app.routing.module / app.module.
// create an array of all routing components export it, then import it in app.module.ts
export const RoutingComponents = [
  DepartmentListComponent,
  EmployeeListComponent,
  HomeComponent,
  ProductListComponent,
]
Syntax & Example: app.module.ts
import {BrowserModule} from '@angular/platform-browser';
import {NgModule} from '@angular/core';

import {AppRoutingModule, RoutingComponents} from './app-routing.module';
import {AppComponent} from './app.component';

// RoutingComponents array - list all the components used in application

// import { DepartmentContactComponent } from './components/department-contact/department-contact.component';
// import { DepartmentDetailsComponent } from './components/department-details/department-details.component';
// import { DepartmentListComponent } from './components/department-list/department-list.component';
// import { DepartmentOverviewComponent } from './components/department-overview/department-overview.component';
// import { EmployeeListComponent } from './components/employee-list/employee-list.component';
// import { HomeComponent } from './components/home/home.component';
// import { ProductListComponent } from './components/product-list/product-list.component';
// import { WildcardPagenotfoundComponent } from './components/wildcard-pagenotfound/wildcard-pagenotfound.component';

@NgModule({
  declarations: [
    AppComponent,
    RoutingComponents,
    // DepartmentDetailsComponent,
    // DepartmentContactComponent,
    // DepartmentOverviewComponent,
    // DepartmentListComponent,
    // EmployeeListComponent,
    // HomeComponent,
    // ProductListComponent,
    // WildcardPagenotfoundComponent

  ],
  imports: [
    BrowserModule,
    AppRoutingModule
  ],
  providers: [],
  bootstrap: [AppComponent]
})
export class AppModule {
}
Syntax & Example: app.component.html
<!--The content below is only a placeholder and can be replaced.-->
<h1 style="text-align:center;"></h1>
<!-- add buttons/links to navigate pages or routings -->
<nav>
<a routerLink="/home" routerLinkActive="active" routerLinkActiveOptions="{exact:true}">Home</a>
<a routerLink="/departments" routerLinkActive="active" routerLinkActiveOptions="{exact:true}">Departments</a>
<a routerLink="/employees" routerLinkActive="active" routerLinkActiveOptions="{exact:true}">Employees</a>
<a routerLink="/products" routerLinkActive="active" routerLinkActiveOptions="{exact:true}">Products</a>
</nav>
<hr/>
<!-- ng new routing-demo-app --routing - defulat include router-outlet in app.component.html. routed views goes here -->
<router-outlet></router-outlet>
Syntax & Example: app.component.ts
import {Component} from '@angular/core';

@Component({
  selector: 'app-root',
  templateUrl: './app.component.html',
  styleUrls: ['./app.component.css']
})
export class AppComponent {
  public appTitle = 'Angular Routing and Navigation Module';
}
Syntax & Example: styles.css
/* You can add global styles to this file, and also import other style files */

/* common global generic styles */
.custom-divider {
  margin: 30px 0px;
  border-bottom: 2px dashed gray;
}

h1, h2, h3 {
  text-transform: uppercase;
  /* text-transform: capitalize; */
}

h2 {
  text-decoration: underline;
}

body {
  font-family: Cambria, Cochin, Georgia, Times, 'Times New Roman', serif;
  letter-spacing: 2px;
}

li {
  margin: 10px 0px;
}

input {
  padding: 5px;
}

button {
  border-radius: 5px;
  padding: 10px 15px;
  background-color: teal;
  border: none;
  outline: none;
  cursor: pointer;
  color: lightcyan;
}

.button-sub {
  background-color: rgba(0, 128, 128, 0.6);
  color: white;
}

/* route and navigation - links */
nav a {
  padding: 10px;
  text-decoration: none;
  margin-top: 10px;
  display: inline-block;
  background-color: #eeeeee;
  border-radius: 4px;
}

nav a:visited, a:link, a {
  color: #607D8B;
}

nav a:hover {
  color: #039be5;
  background-color: #CFD8DC;
}

nav a.active {
  color: #039be5;
  font-weight: bold;
  text-decoration: underline;
}

/* route and navigation - list badge */
.items {

}

.items li, .link-sub {
  width: 200px;
  cursor: pointer;
  width: 150px;
  padding: 10px;
  text-decoration: none;
  margin-top: 10px;
  background-color: #eeeeee;
  border-radius: 4px;
}

.badge {
  background: teal;
  padding: 10px;
  margin-right: 5px;
  position: relative;
  left: -10px;
  border-radius: 4px 0px 0px 4px;
}

.description {

}

/* optional parameter - show highlighted */
.items li.selected {
  color: #039be5;
  background-color: #CFD8DC;
}
2 Wildcard Route and Redirecting Routes (Dealing with unavailable-non-configured route [Page not found])
- User can type/enter any unavailable-non-configured route/URL and can get many erros in console, like
http://localhost:5000/tryError:(Cannot match any routes, URL segment 'try'...) - To deal/handle any unwanted path or unavailable routes we must need to create a new component named
page not found componentOR404 componentandadd 'wildcard **'route Wildcard **routes or any paths with parameters (employees/1 or routes/parameters)must come lastinapp-routing.module.tsrouter configuration as router tries to match the paths from top to bottom- In
app-routing.module.tsroute must be configured in order:most specific at the tpo to list important/specific at the bottom - Default Route: While using
wildcard **routes we also need to providedefault route like '{ path: '', component:DepartmentListComponent}' OR '{ path: '', redirectTo:'departments', pathMatch:'full'}'
Steps:
- Create a new component for page not found:
ng g c wildcard-pagenotfoundwith a instructional markup:404 page not found! - In
app-routing.module.tsat the bottom/last add a new wildcard route:{ path: '**', component: WildcardPagenotfoundComponent }
Syntax & Example: wildcard-pagenotfound.component.html
<p>
  404 page not found! <br/>
  Path/URL not available!! <br/>
  <strong>Try Again!!!</strong>
</p>
Syntax & Example: app-routing.module.ts
import {NgModule} from '@angular/core';
import {Routes, RouterModule} from '@angular/router';

import {DepartmentListComponent} from './components/department-list/department-list.component';
import {EmployeeListComponent} from './components/employee-list/employee-list.component';
import {HomeComponent} from './components/home/home.component';
import {ProductListComponent} from './components/product-list/product-list.component';
import {WildcardPagenotfoundComponent} from './components/wildcard-pagenotfound/wildcard-pagenotfound.component';

const routes: Routes = [
  // default path
  // { path: '', component:DepartmentListComponent},
  {path: 'home', component: HomeComponent},
  {path: '', redirectTo: 'home', pathMatch: 'full'},
  {path: 'departments', component: DepartmentListComponent},
  {path: 'employees', component: EmployeeListComponent},
  {path: 'products', component: ProductListComponent},
  {path: '**', component: WildcardPagenotfoundComponent}
];

@NgModule({
  imports: [RouterModule.forRoot(routes)],
  exports: [RouterModule]
})
export class AppRoutingModule {
}

// to store all routing component and avoid importing/writing duplicate list of components in app.routing.module / app.module.
// create an array of all routing components export it then imports it in app.module.ts
export const RoutingComponents = [
  DepartmentListComponent,
  EmployeeListComponent,
  HomeComponent,
  ProductListComponent,
  WildcardPagenotfoundComponent,
]
3 Route Parameters
- In this section will learn to pass and read route parameters, as given below:
- http://localhost:4200/departments/production
- http://localhost:4200/user/1
- http://localhost:4200/employee/100
- In
app-routing.module.tscreatedepartments/:idpath route parameters for items under department list component - In
department-list.component.tsclass file create a array of departments object - In
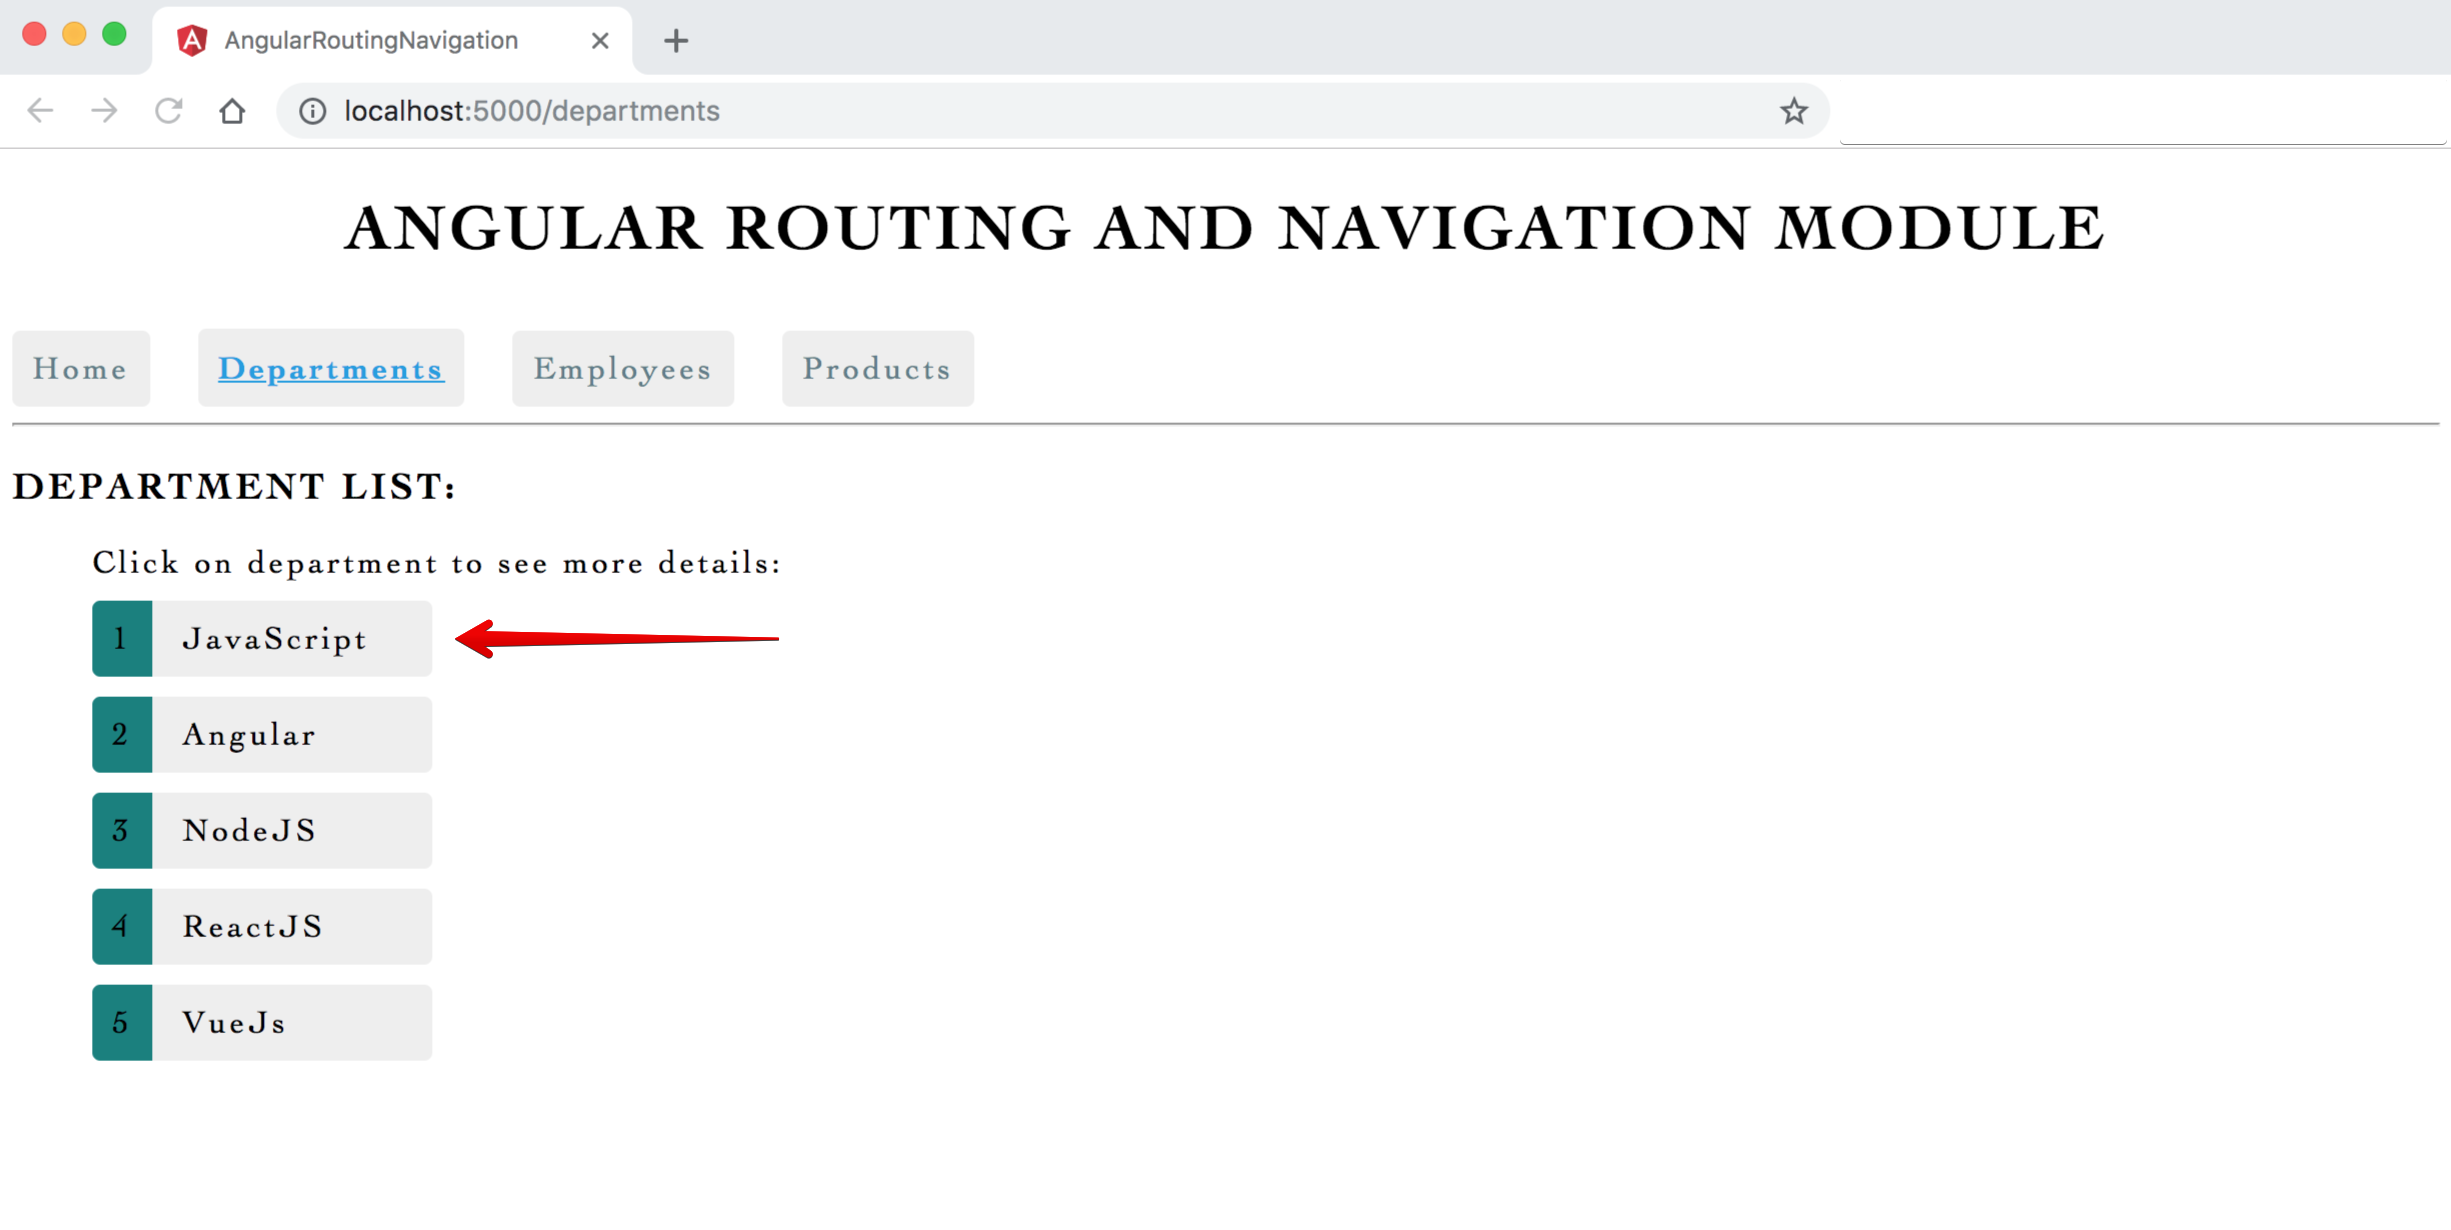
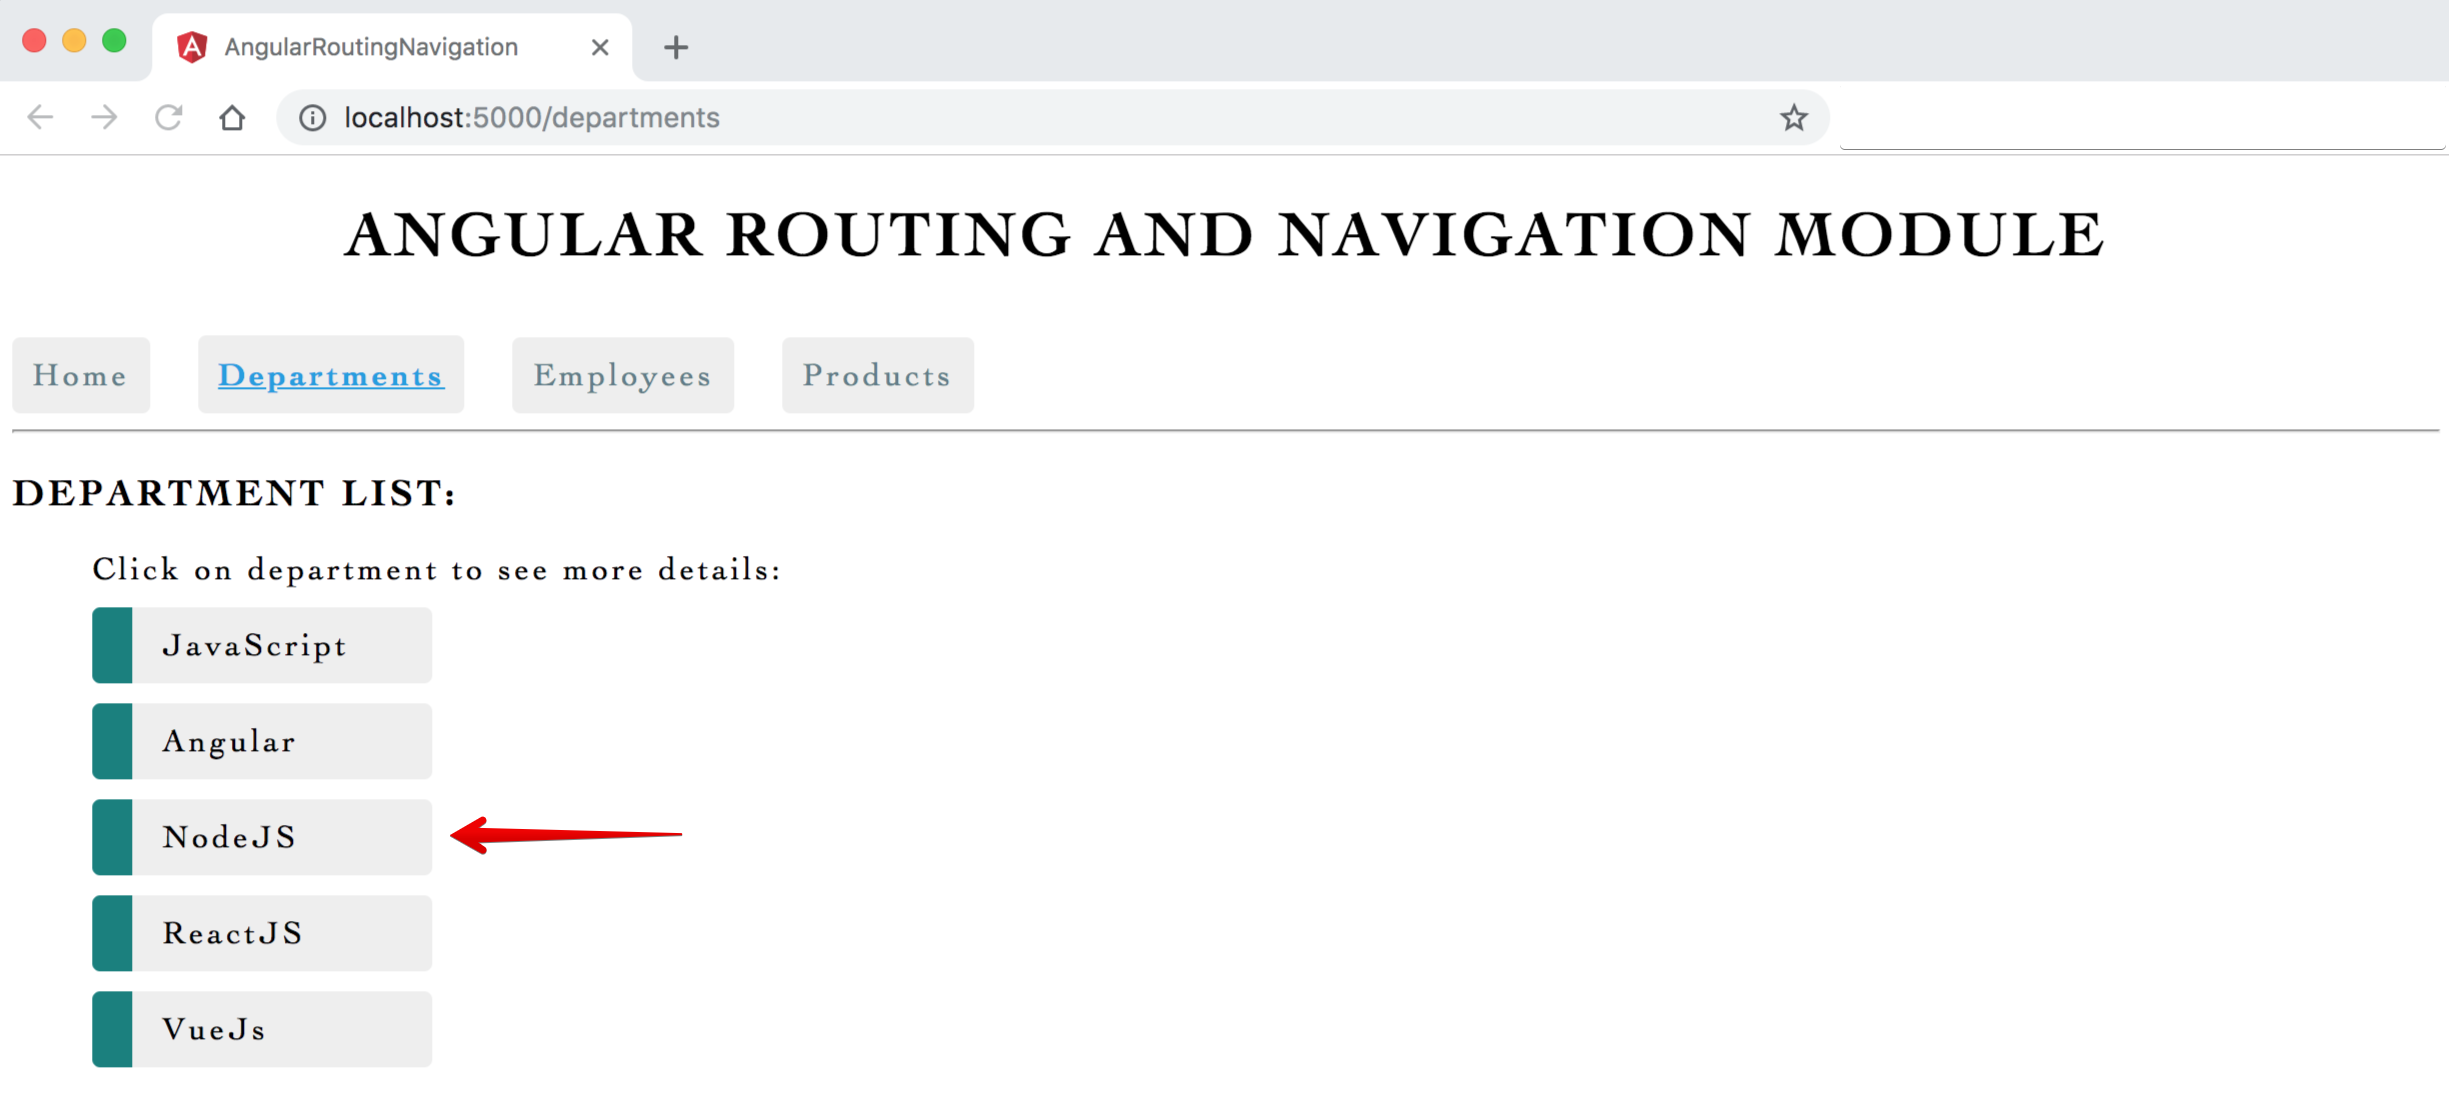
department-list.component.htmlview file iterate/*ngFor through departments array and pass departments id as a route parameter- on click of the department list item, it will take to
department-details.component page with selected department id, at the same time browser location path will be displayed aslocalhost:5000/department:2 (selected department id ) - To navigate from code/links/buttons we need
router service as a dependency
- on click of the department list item, it will take to
- Create and use a new component to show details:
department-details.component.ts- read the departments id passed as a parameter and show the route view accordinglyactivatedRoute.snapshot.paramMap.get()is used to read the routes/parameters passed
Syntax & Example: department-list.component.ts
import {Component, OnInit} from '@angular/core';
import {Router} from '@angular/router';

@Component({
  selector: 'app-department-list',
  templateUrl: './department-list.component.html',
  styleUrls: ['./department-list.component.css']
})
export class DepartmentListComponent implements OnInit {
  public departments = [
    {'id': 1, 'name': 'JavaScript'},
    {'id': 2, 'name': 'Angular'},
    {'id': 3, 'name': 'NodeJS'},
    {'id': 4, 'name': 'ReactJS'},
    {'id': 5, 'name': 'VueJs'},
  ]

  constructor(private router: Router) {
  }

  ngOnInit() {

  }

  onLinkSelect(curDepartment) {
    console.log('onLinkSelect curDepartment');
    // navigate ( path, route parameter)
    this.router.navigate(['departments', curDepartment.id]);
  }

}
Syntax & Example: department-list.component.html
<div>
  <h3>Department list:</h3>

  <ul class="items">
    Click on department to see more details:
    <!-- on link click call function/method to navigate -->
    <li *ngFor="let department of departments" (click)="onLinkSelect(department)">
      <span class="badge"></span>
      <span class="description"></span>
    </li>
  </ul>

</div>
Syntax & Example: app-routing.module
import {NgModule} from '@angular/core';
import {Routes, RouterModule} from '@angular/router';

import {DepartmentDetailsComponent} from './components/department-details/department-details.component';
import {DepartmentListComponent} from './components/department-list/department-list.component';
import {EmployeeListComponent} from './components/employee-list/employee-list.component';
import {HomeComponent} from './components/home/home.component';
import {ProductListComponent} from './components/product-list/product-list.component';
import {WildcardPagenotfoundComponent} from './components/wildcard-pagenotfound/wildcard-pagenotfound.component';

const routes: Routes = [
  // default path
  // { path: '', component:DepartmentListComponent},
  {path: 'home', component: HomeComponent},
  {path: '', redirectTo: 'home', pathMatch: 'full'},
  {path: 'departments', component: DepartmentListComponent},
  {path: 'departments/:id', component: DepartmentDetailsComponent},
  {path: 'employees', component: EmployeeListComponent},
  {path: 'products', component: ProductListComponent},
  {path: '**', component: WildcardPagenotfoundComponent}
];

@NgModule({
  imports: [RouterModule.forRoot(routes)],
  exports: [RouterModule]
})
export class AppRoutingModule {
}

// to store all routing component and avoid importing/writing duplicate list of components in app.routing.module / app.module.
// create an array of all routing components export it then imports it in app.module.ts
export const RoutingComponents = [
  DepartmentDetailsComponent,
  DepartmentListComponent,
  EmployeeListComponent,
  HomeComponent,
  ProductListComponent,
  WildcardPagenotfoundComponent,
]
Syntax & Example: department-details.component.ts
import {Component, OnInit} from '@angular/core';
import {ActivatedRoute} from '@angular/router';

@Component({
  selector: 'app-department-details',
  templateUrl: './department-details.component.html',
  styleUrls: ['./department-details.component.css']
})
export class DepartmentDetailsComponent implements OnInit {
  // to hold the currently passed id parameter
  public selectedDepartmentId;

  constructor(private activatedRoute: ActivatedRoute) {
  }

  ngOnInit() {
    // read the route parameter

    // snapshot approach
    console.log(this.activatedRoute.snapshot.paramMap);
    let routeParamId = parseInt(this.activatedRoute.snapshot.paramMap.get('id'));
    this.selectedDepartmentId = routeParamId;
  }

}
Syntax & Example: department-details.component.html
<h3>Selected Deparment Details ID : </h3>

4 paramMap Observable
- Using the
activatedRoute.snapshotgot some drawback like: when will navigate back next / previous next from child component(details component to list component)snapshot approach does not work- In department-details.component.html add links Previous & Next to see rest of departments with click handler
<a (click)="goPrevious()">Back </a> - In
department-details.component.tscreate a handlergoPrevious()&goNext()with required logic - If you will observe the drawback here is on Previous & Next button clicks,
only url updates/changing but view/template not changing (ngOnInit does not get call) - To overcome activatedRoute.snapshot problems will use
paramMap Observable with subscribe
- In department-details.component.html add links Previous & Next to see rest of departments with click handler
Syntax & Example: department-details.component.html
<h3>Selected Deparment Details ID : </h3>
<br/>
<a (click)="goPrevious()" class="link-sub">Previous</a>
<a (click)="goNext()" class="link-sub">Next</a>
Syntax & Example: department-details.component.ts
import {Component, OnInit} from '@angular/core';
import {ActivatedRoute, Router, ParamMap} from '@angular/router';

@Component({
  selector: 'app-department-details',
  templateUrl: './department-details.component.html',
  styleUrls: ['./department-details.component.css']
})
export class DepartmentDetailsComponent implements OnInit {
  // to hold the currently passed id parameter
  public selectedDepartmentId;

  constructor(private activatedRoute: ActivatedRoute, private router: Router) {
  }

  ngOnInit() {
    // read the route parameter

    // snapshot approach
    // console.log(this.activatedRoute.snapshot.paramMap);
    // let routeParamId = parseInt(this.activatedRoute.snapshot.paramMap.get('id'));
    // this.selectedDepartmentId = routeParamId;

    // paramMap Observable approach
    this.activatedRoute.paramMap.subscribe((params: ParamMap) => {
      let id = parseInt(params.get('id')); // let id = Number(params.get('id'))
      this.selectedDepartmentId = id;
    })
  }

  goPrevious() {
    let previousId = this.selectedDepartmentId - 1;
    this.router.navigate(['/departments', previousId]);
  }

  goNext() {
    let nextId = this.selectedDepartmentId + 1;
    this.router.navigate(['/departments', nextId]);
  }

}


5 Optional Route Parameters
- By using
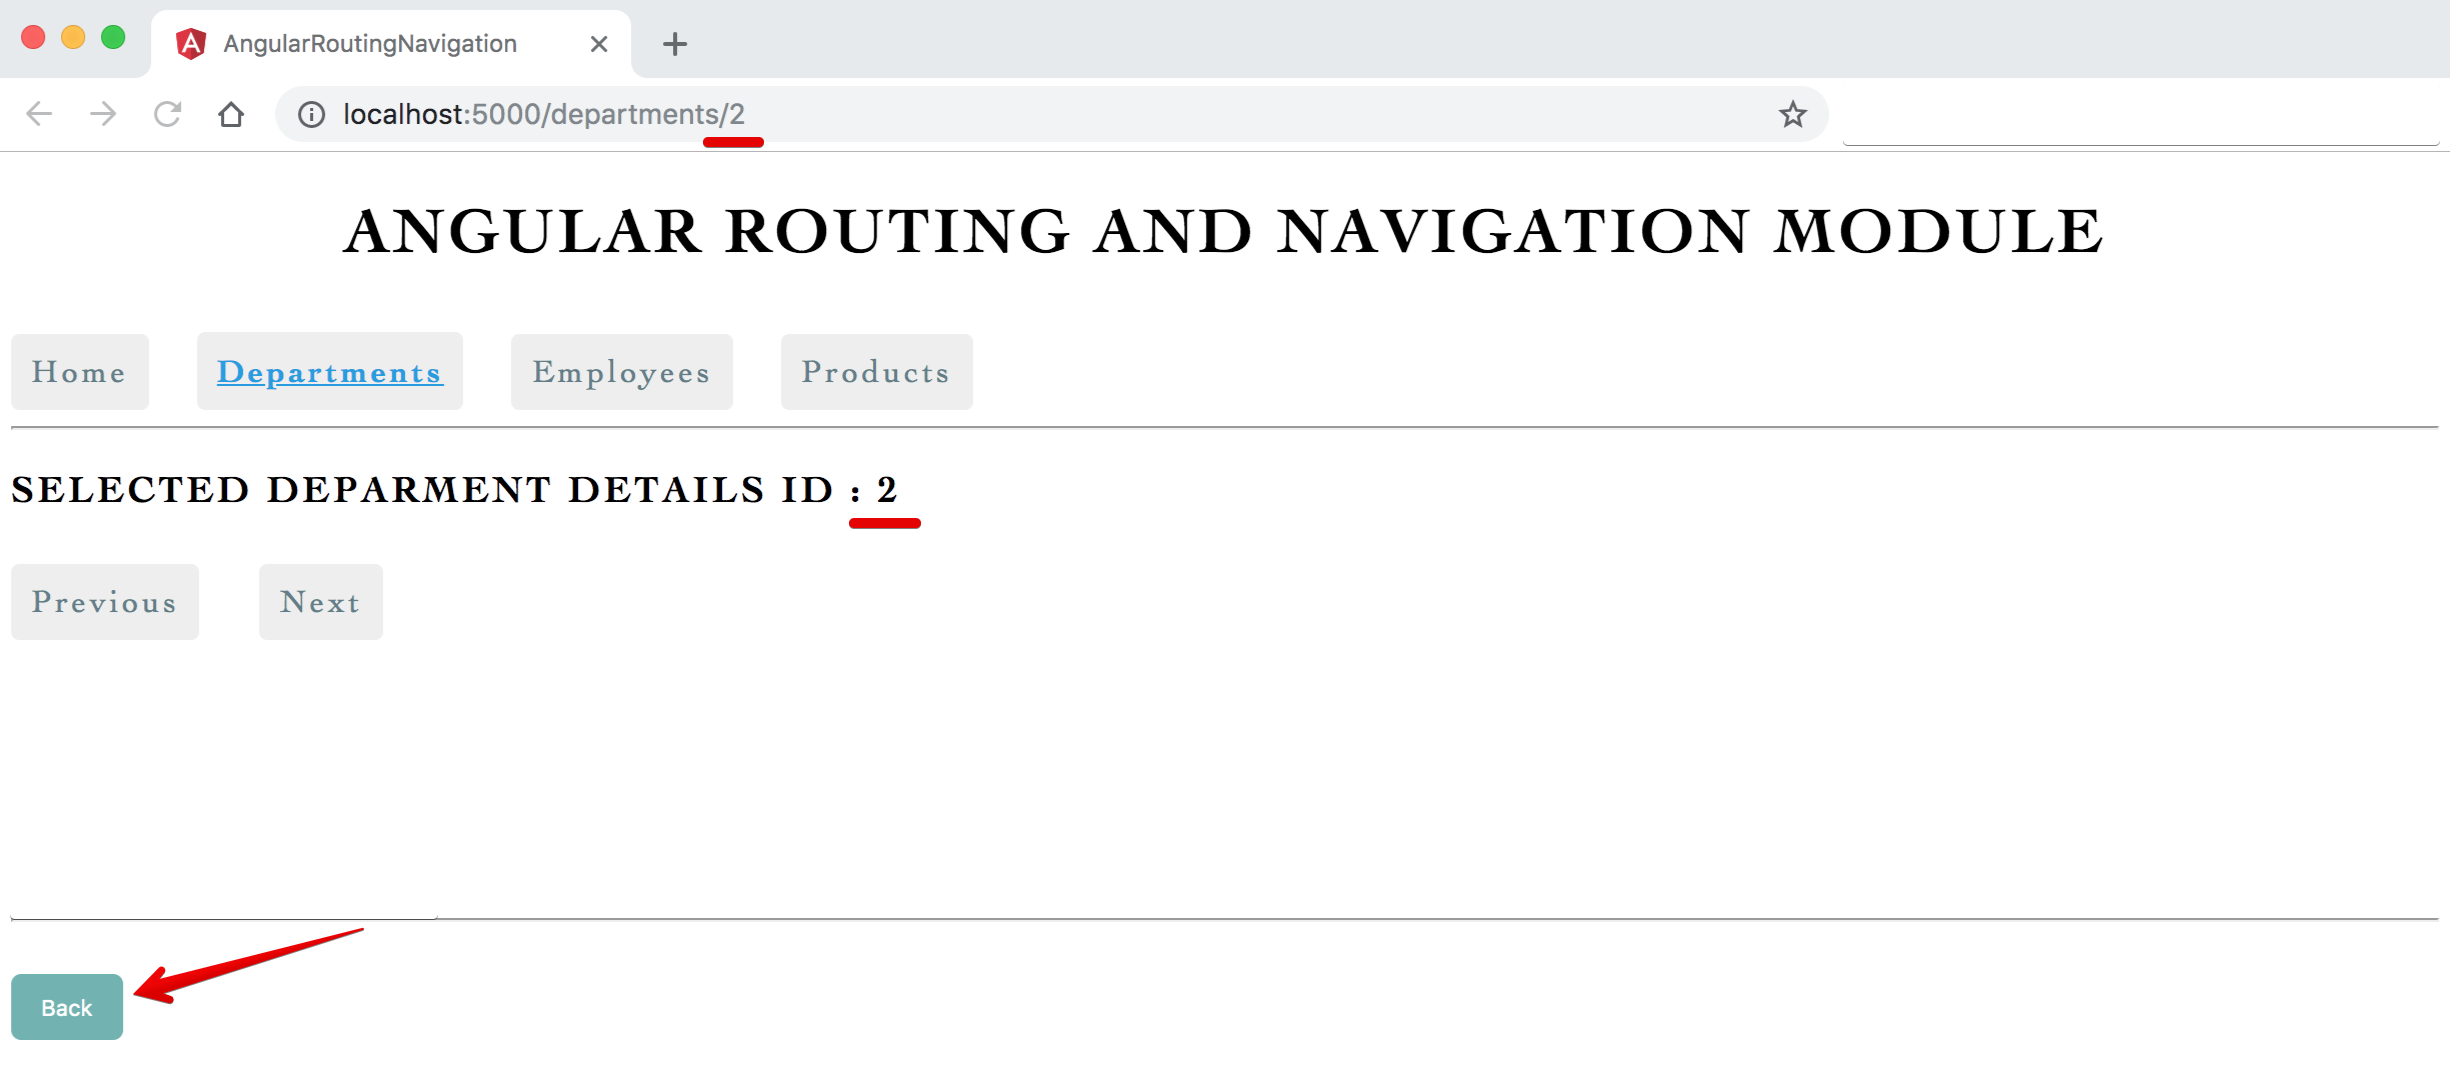
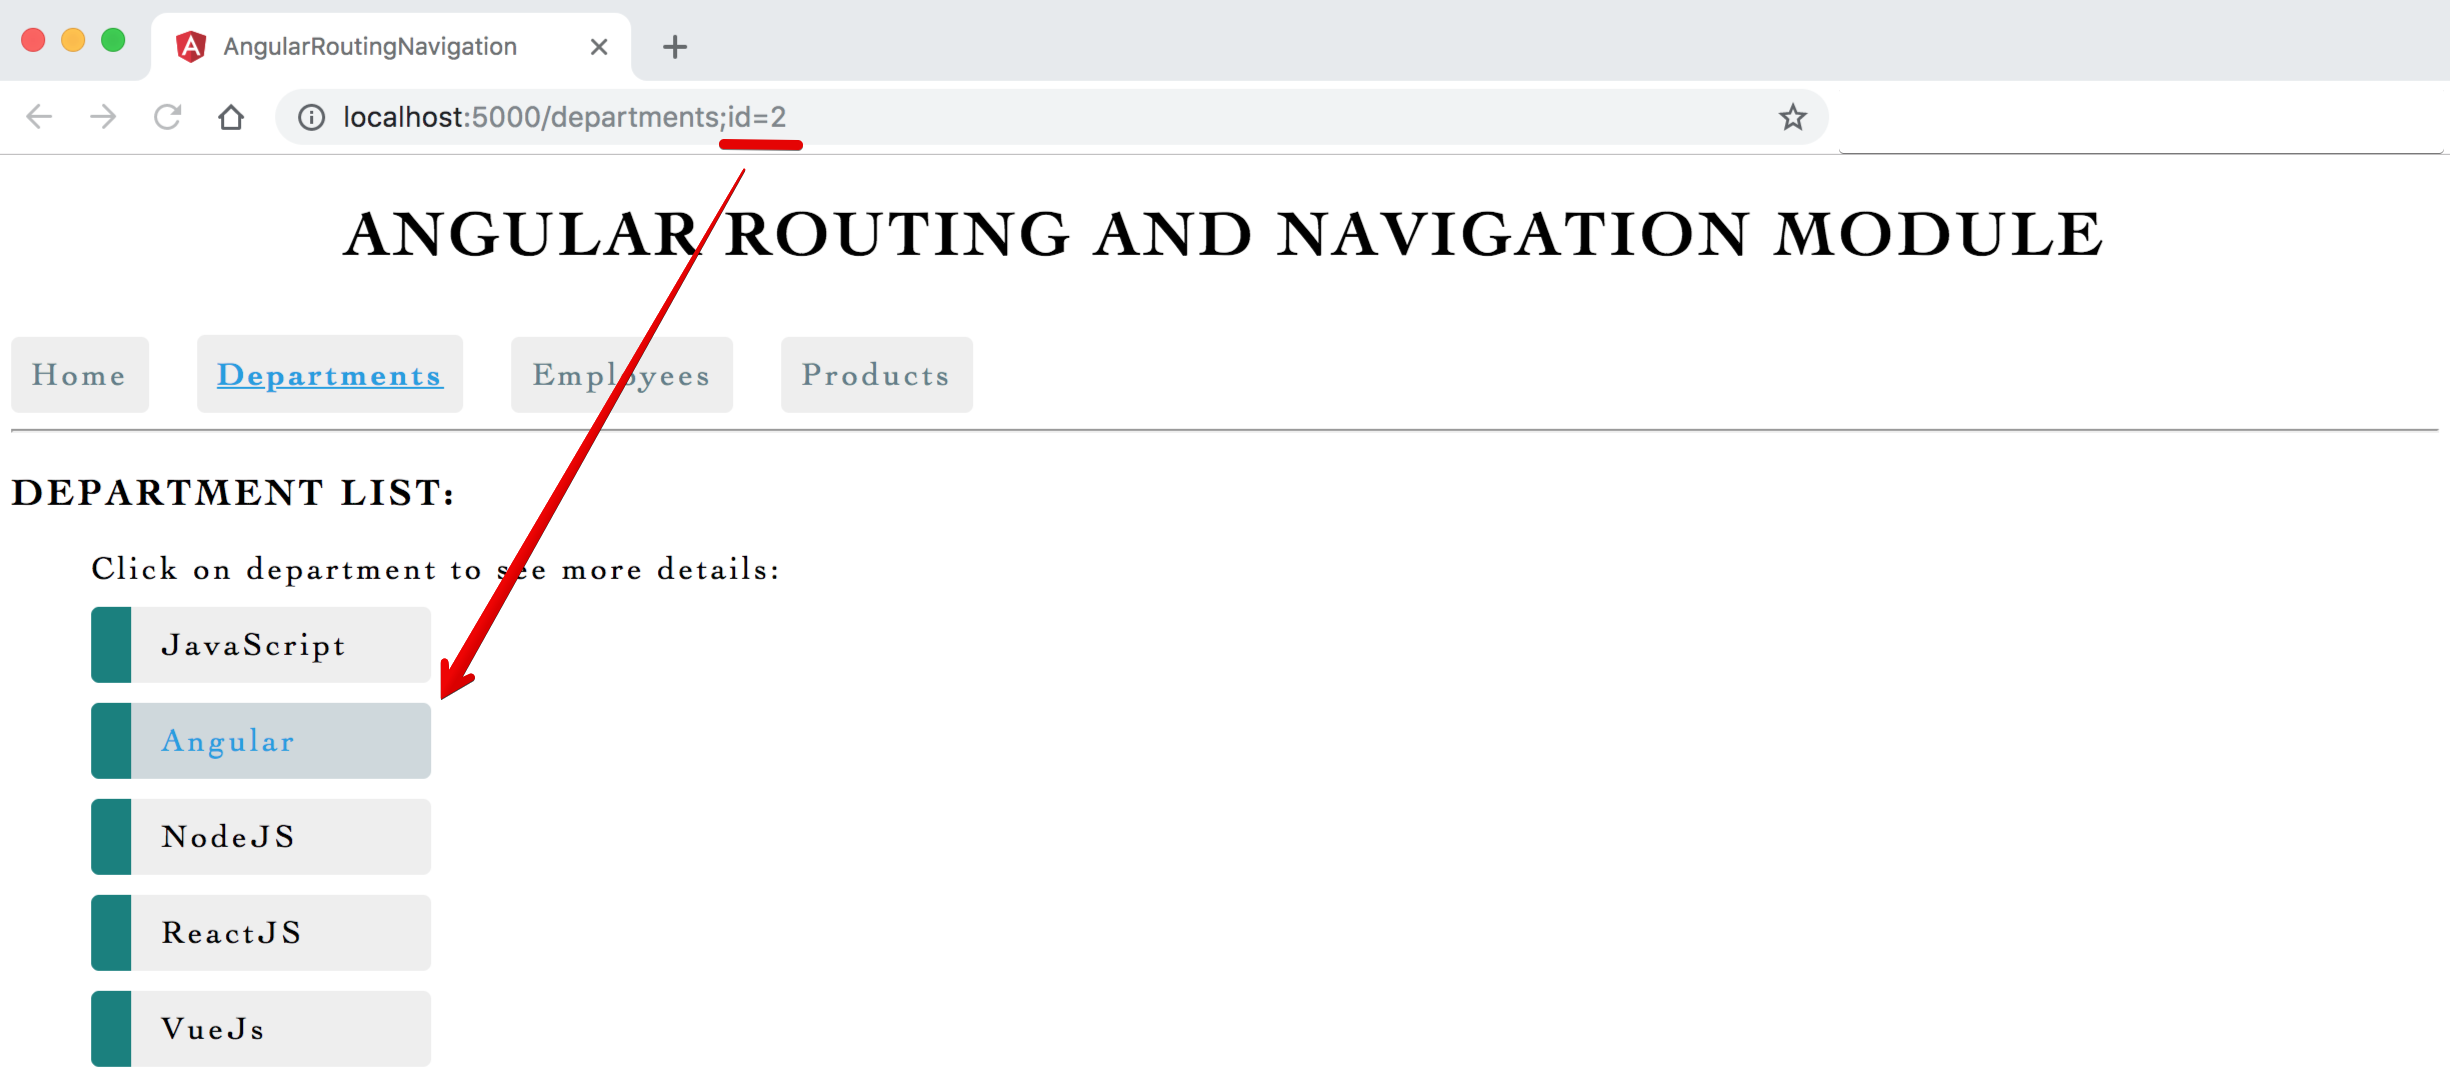
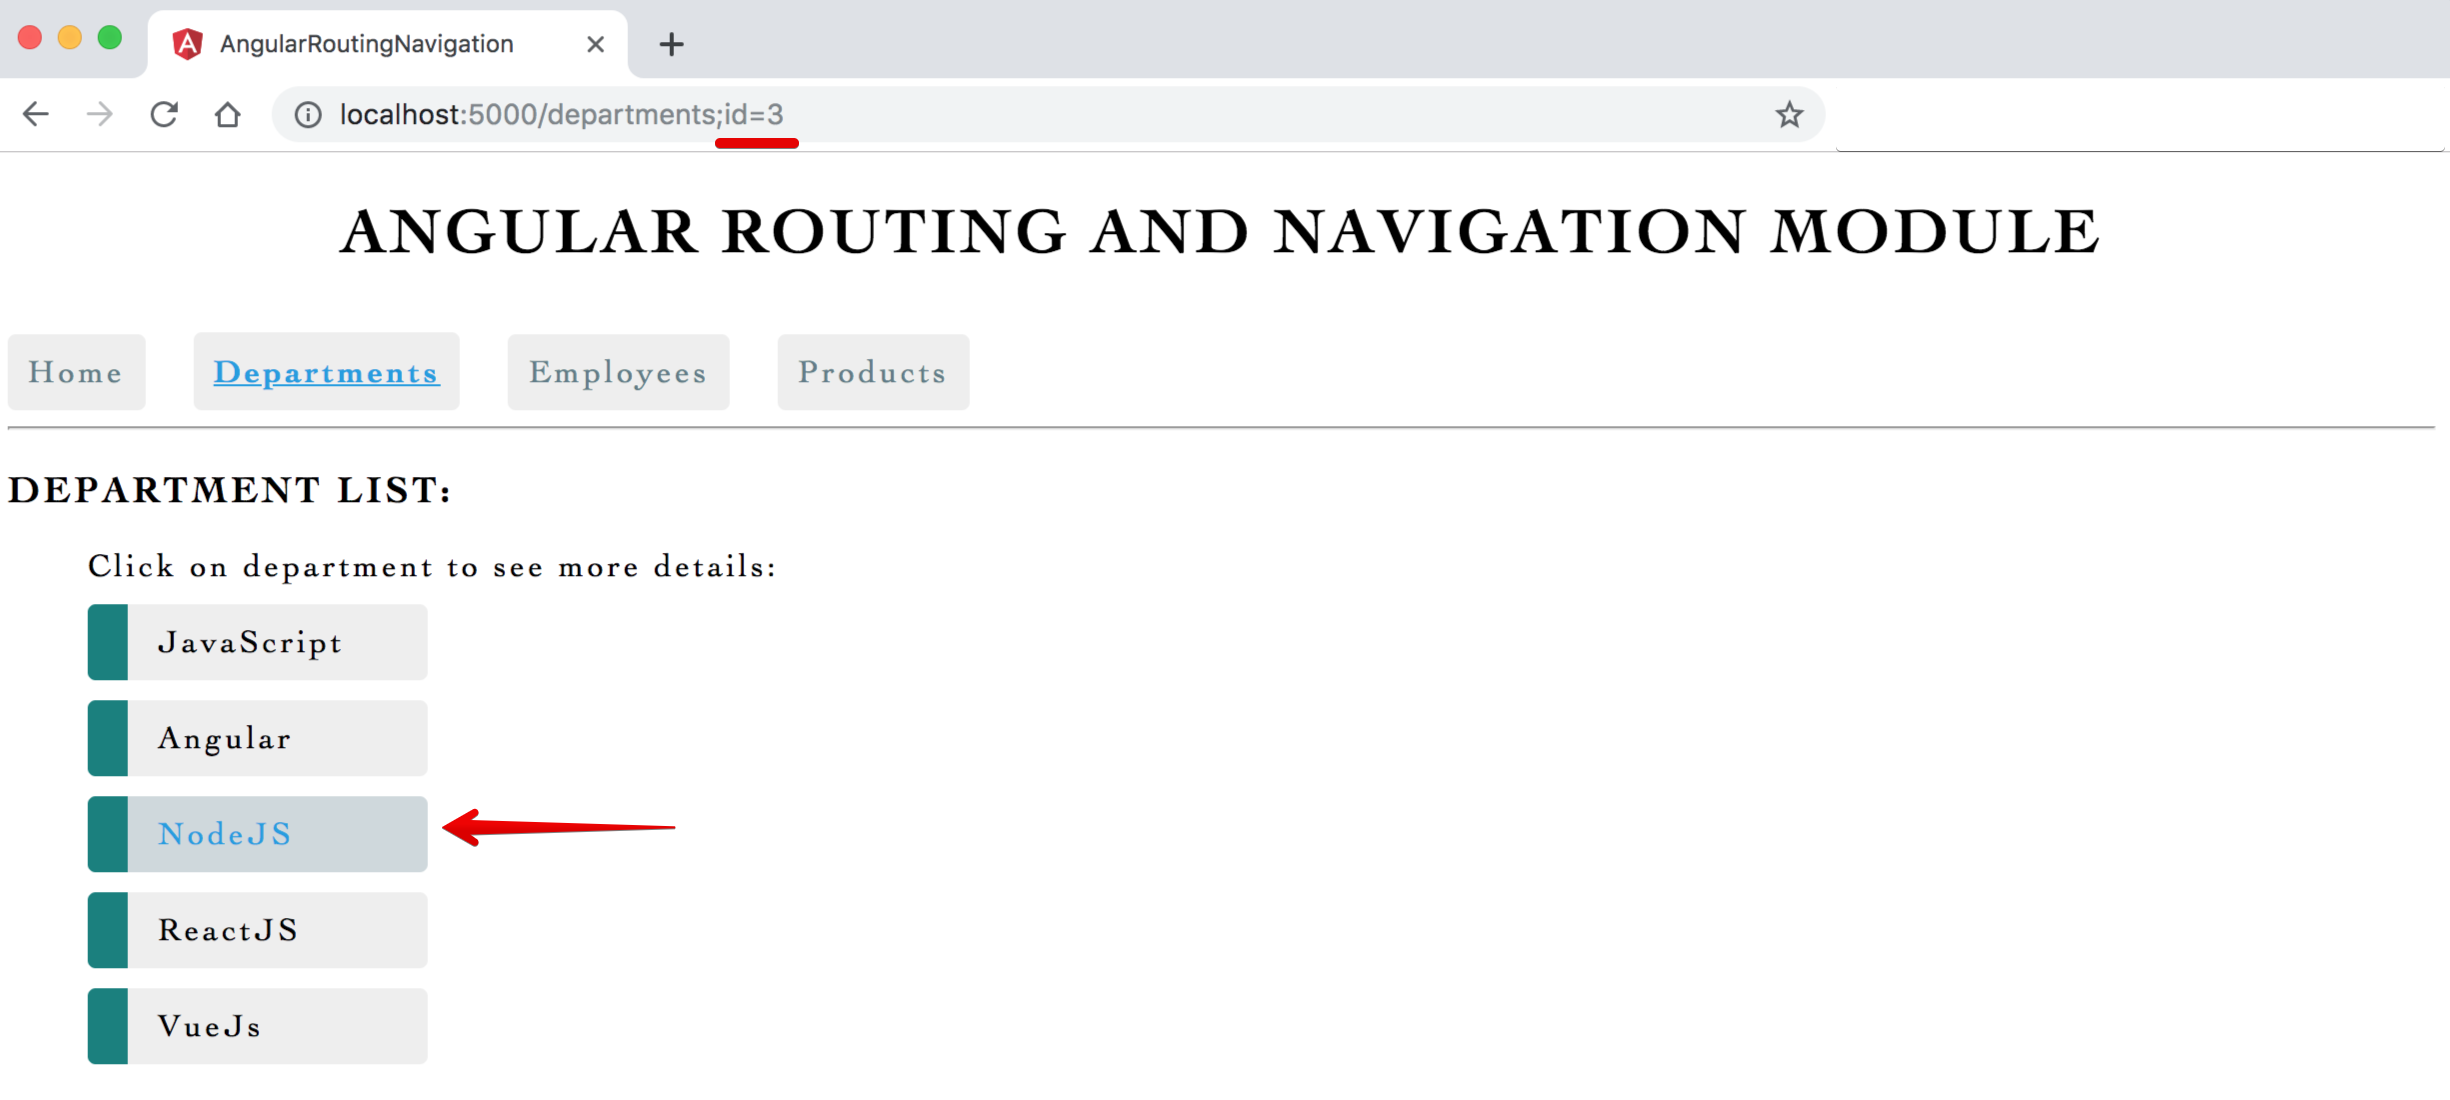
Back button in department-details.component.htmlwe mustnavigate back to department-list.component.htmland show clicked department in selected state`- In department-details.component add
Backbutton:<button click="goToDepartments()">Back </button> - In
department-details.component.tscreate a handler ` goToDepartments()with required logic, // Use Back button to go to main list page and highlight the link by passing optional parameters with departments details, when back it shows in urlhttp://localhost:5000/departments;id=4` - In
department-list.component.tsadd required login inngOnInit()life cycle hook to read the passed optional parameter and to highlight clicked department button
- In department-details.component add
Syntax & Example: department-details.component.html
<!-- // back button - method to handle optional parameters and show current clicked department highlighted -->
<button (click)="goToDepartments()" class="button-sub">Back</button>
Syntax & Example: department-details.component.ts
// back button - method to handle optional parameters and show current department highlighted
goToDepartments()
{
  console.log('goToDepartments clicked');
  let currentSelectedId = this.selectedDepartmentId ? this.selectedDepartmentId : null
  //sending optional parameter - used for some logic
  //this.router.navigate(["/departments", { id: currentSelectedId, test: 'test-param-value' }])

  // relative path, links parameter array - {key:value}, {relativeTo property}
  // we can pass multiple parameters as per our requirements
  // this.router.navigate(['../', { id: currentSelectedId, name: 'Hello'  }]);
  this.router.navigate(['../', {id: currentSelectedId}]);
}
Syntax & Example: department-list.component.ts
ngOnInit()
{
  this.activatedRoute.paramMap.subscribe((params: ParamMap) => {
    let id = parseInt(params.get('id')); // let id = Number(params.get('id'))
    this.selectedDepartmentId = id;
  })
}

/* on department click */
onLinkSelect(curDepartment)
{
  console.log('onLinkSelect curDepartment');
  // navigate ( path, route parameter)
  // this.router.navigate(['departments', curDepartment.id]);

  // relative path, links parameter array, relativeTo property
  this.router.navigate([curDepartment.id]);
}

// to compare/match current route clicked and optional parameter
isSelectedRouteMatchOptionalParam(curDepartment)
{
  return curDepartment.id === this.selectedDepartmentId;
}
Syntax & Example: styles.css
/* optional parameter - show highlighted */
.items li.selected {
  color: #039be5;
  background-color: #CFD8DC;
}
6 Relative Navigation
Absolute pathstarts withforward slash /(paths like/nameare absolute/fixed path)Absolute/Fixed paths are not flexibleas if file/route name changes we need to make change at all occurrences/places in an application- Its advisable to use relative path/navigation with
relativeToproperty
Syntax & Example: department-list.component.ts
/* on department click */
onLinkSelect(curDepartment)
{
  console.log('onLinkSelect curDepartment');
  // navigate ( path, route parameter)
  // this.router.navigate(['departments', curDepartment.id]);

  // relative path, links parameter array, relativeTo property
  this.router.navigate([curDepartment.id], {relativeTo: this.activatedRoute}); // to the current route  append the department id and navigate to that URL
}
Syntax & Example: department-details.component.ts
// back button - method to handle optional parameters and show current department highlighted
goToDepartments()
{
  console.log('goToDepartments clicked');
  let currentSelectedId = this.selectedDepartmentId ? this.selectedDepartmentId : null
  //sending optional parameter - used for some logic
  //this.router.navigate(["/departments", { id: currentSelectedId, test: 'test-param-value' }])

  // relative path, links parameter array - {key:value}, {relativeTo property}
  // we can pass multiple parameters as per our requirements
  // this.router.navigate(['../', { id: currentSelectedId, name: 'Hello'  }]);
  this.router.navigate(['../', {id: currentSelectedId}], {relativeTo: this.activatedRoute});  // to the current route  append the department id and navigate to that URL
}
7 Child Routes
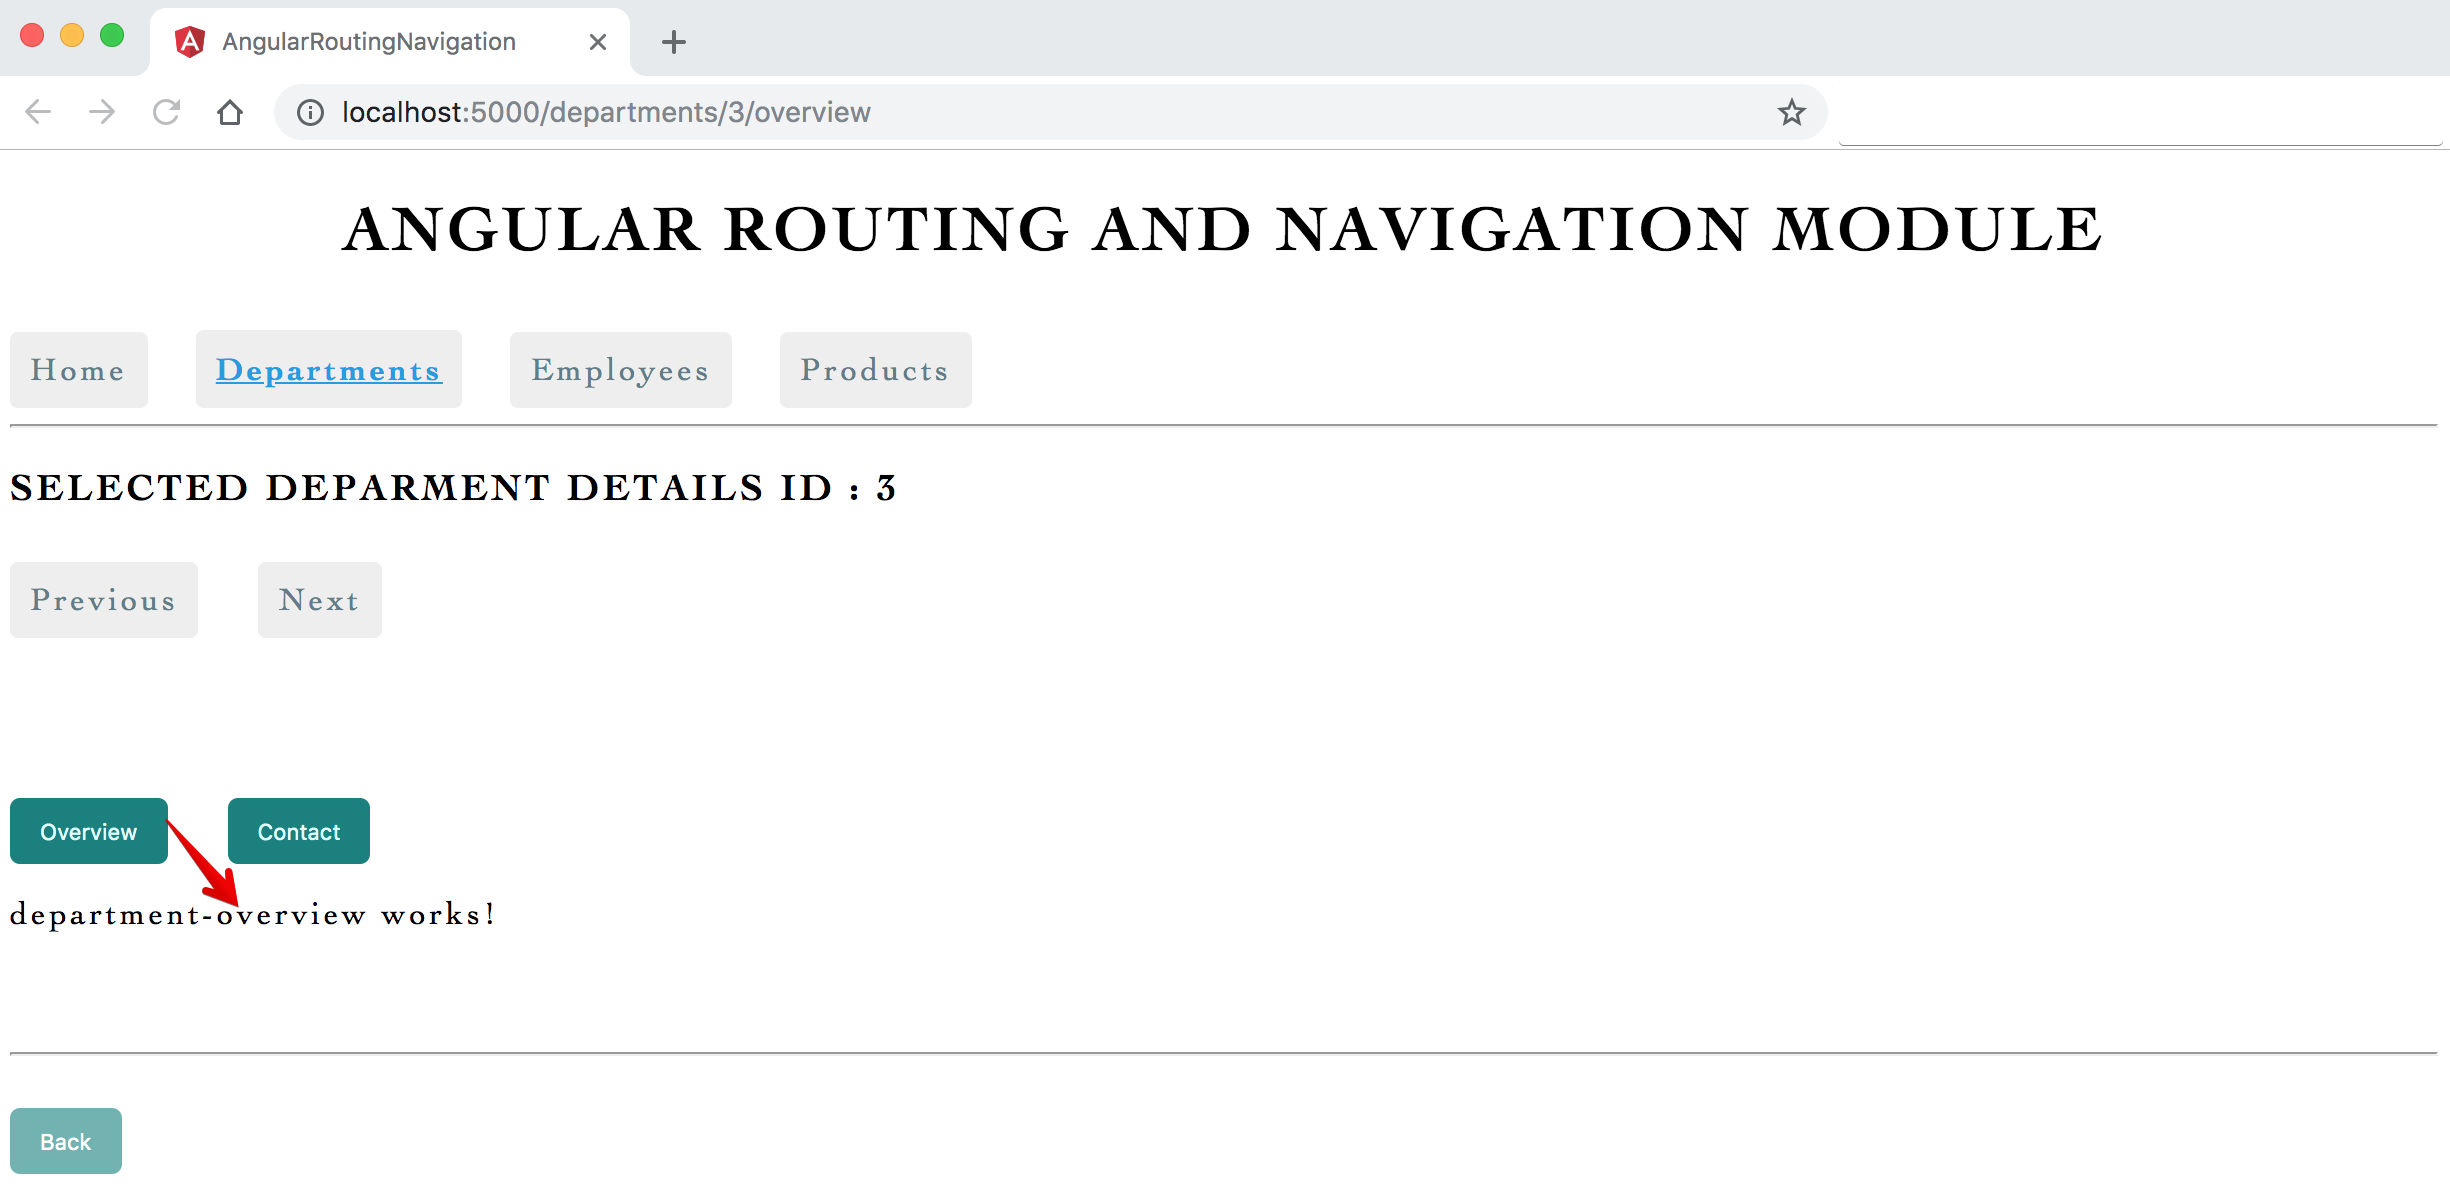
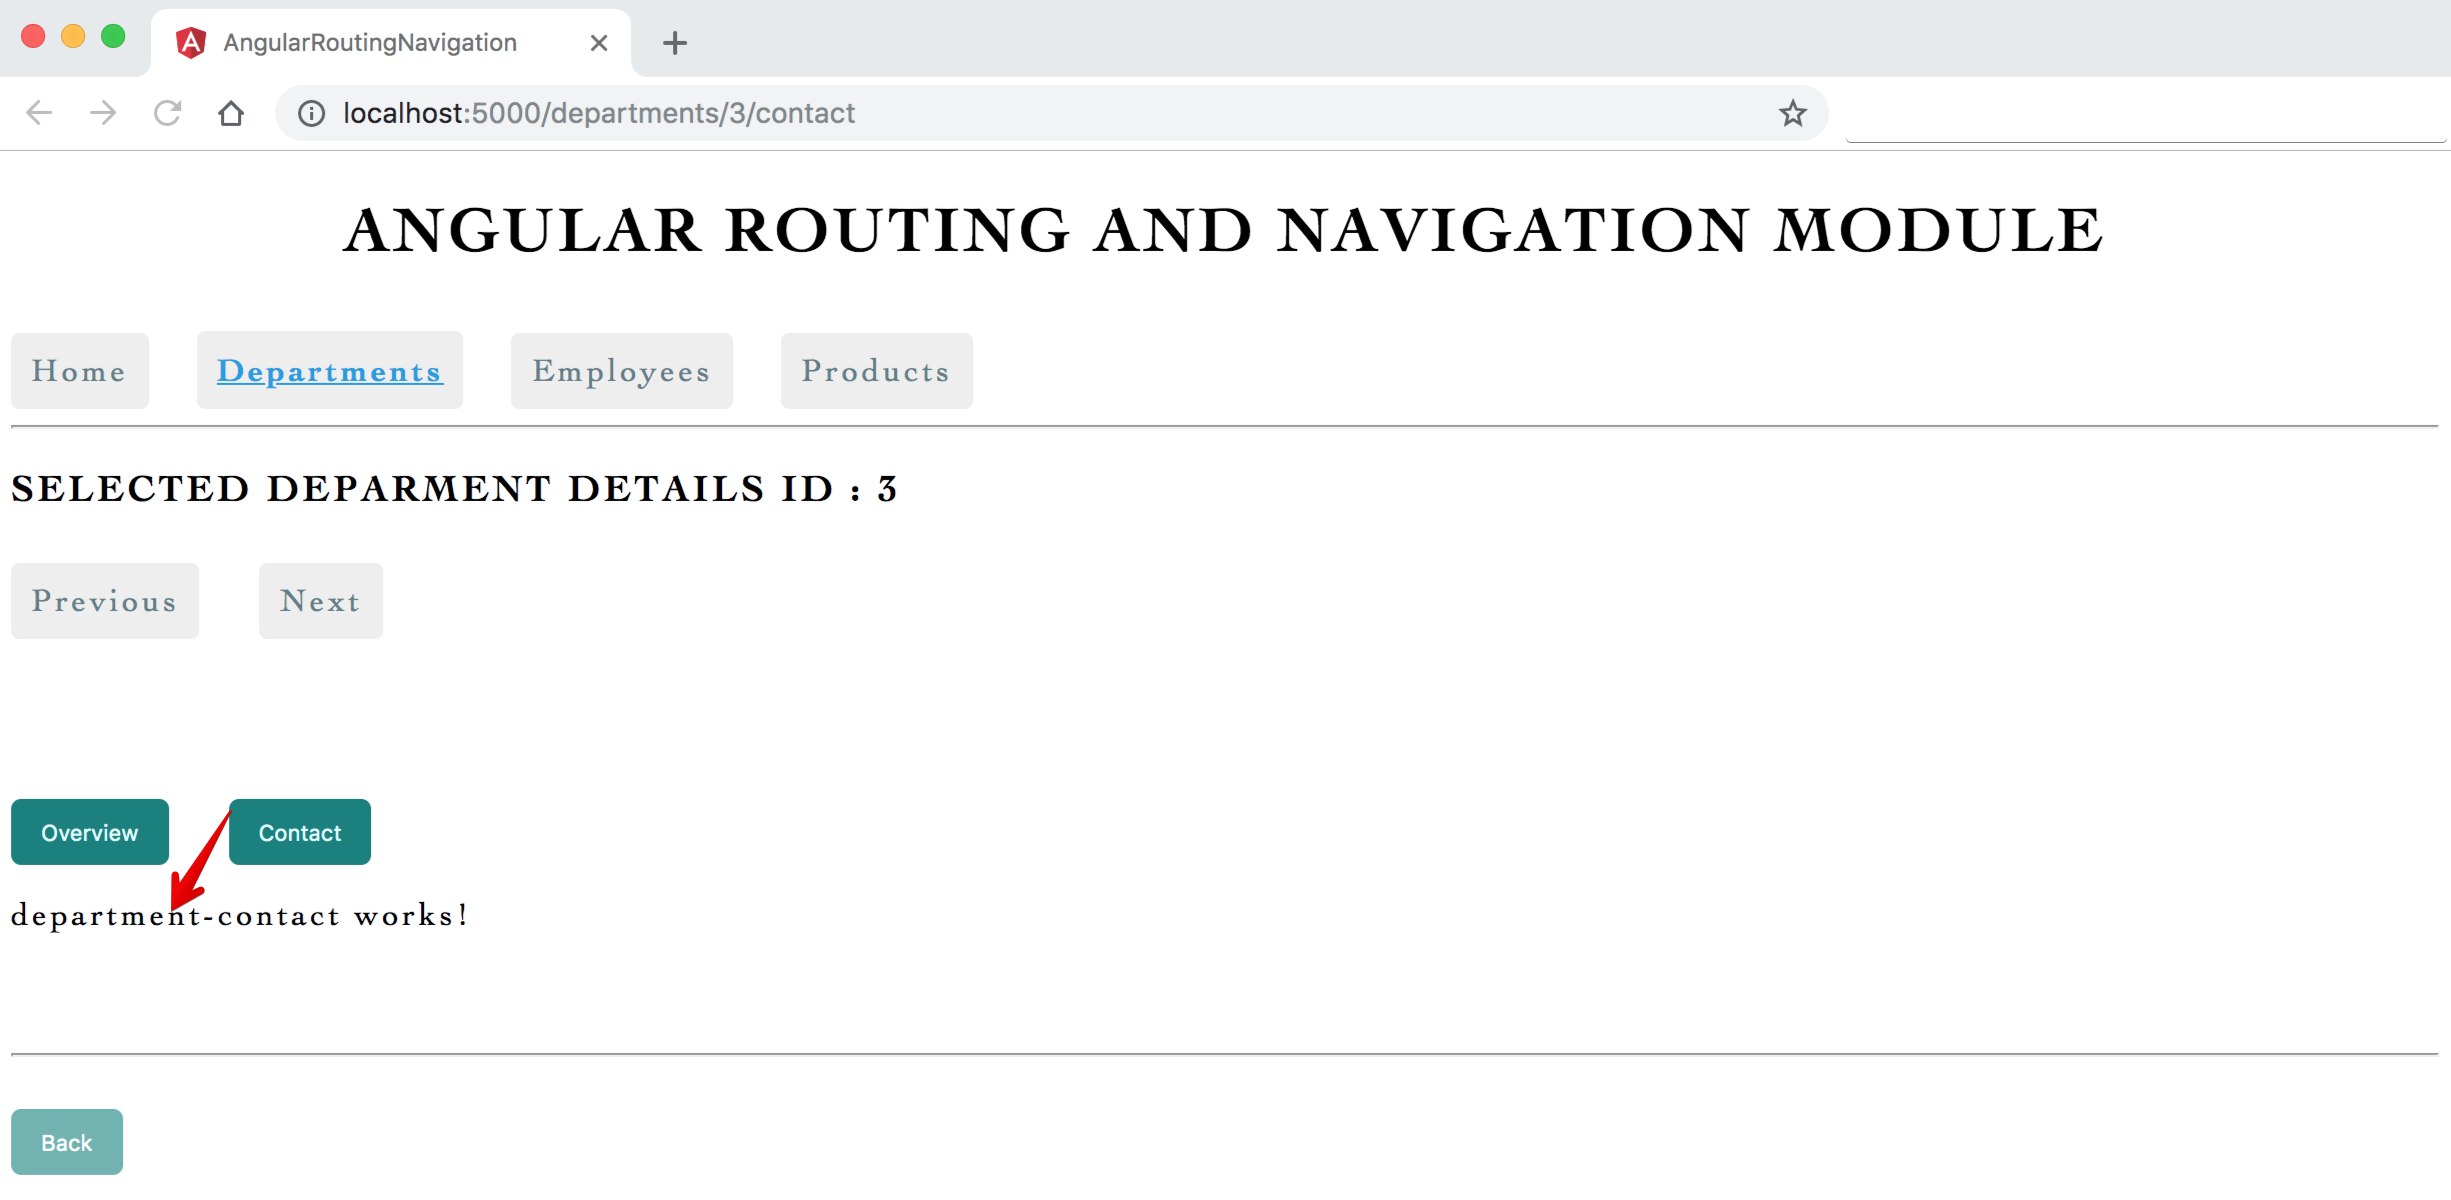
- In application, some routes/path/links/pages viewed only within other routes - in such scenario we can create and use child routes in app-routing.module.ts
- Like inside department-details component we need to show links/pages like: Overview, Contact, Pictures etc.
- Create child components with angular cli command:
department-overview- ng g c department-overviewdepartment-contact- ng g c department-contact
- Change/add app-routing.module.ts with
childrenproperty - Inside
parent component department-detailscreate<router-outlet>as a container area for loading pages, also create buttonsoverviewandcontactto navigate to component/pages/route<button (click)="showOverview()">Overview</button>
Syntax & Example: app-routing.module.ts
import {NgModule} from '@angular/core';
import {Routes, RouterModule} from '@angular/router';

import {DepartmentContactComponent} from './components/department-contact/department-contact.component';
import {DepartmentDetailsComponent} from './components/department-details/department-details.component';
import {DepartmentListComponent} from './components/department-list/department-list.component';
import {DepartmentOverviewComponent} from './components/department-overview/department-overview.component';
import {EmployeeListComponent} from './components/employee-list/employee-list.component';
import {HomeComponent} from './components/home/home.component';
import {ProductListComponent} from './components/product-list/product-list.component';
import {WildcardPagenotfoundComponent} from './components/wildcard-pagenotfound/wildcard-pagenotfound.component';

const routes: Routes = [
  // default path
  // { path: '', component:DepartmentListComponent},
  {path: 'home', component: HomeComponent},
  {path: '', redirectTo: 'home', pathMatch: 'full'},
  {path: 'departments', component: DepartmentListComponent},
  {
    path: 'departments/:id', component: DepartmentDetailsComponent,
    children: [
      {path: 'overview', component: DepartmentOverviewComponent},
      {path: 'contact', component: DepartmentContactComponent},
    ]
  },
  {path: 'employees', component: EmployeeListComponent},
  {path: 'products', component: ProductListComponent},
  {path: '**', component: WildcardPagenotfoundComponent}
];

@NgModule({
  imports: [RouterModule.forRoot(routes)],
  exports: [RouterModule]
})
export class AppRoutingModule {
}

// to store all routing component and avoid importing/writing duplicate list of components in app.routing.module / app.module.
// create an array of all routing components export it then import it in app.module.ts
export const RoutingComponents = [
  DepartmentContactComponent,
  DepartmentDetailsComponent,
  DepartmentListComponent,
  DepartmentOverviewComponent,
  EmployeeListComponent,
  HomeComponent,
  ProductListComponent,
  WildcardPagenotfoundComponent,
]
Syntax & Example: department-details.component.html
<h3>Selected Deparment Details ID : </h3>
<br/>
<a (click)="goPrevious()" class="link-sub">Previous</a>
<a (click)="goNext()" class="link-sub">Next</a>
<button (click)="showOverview()">Overview</button>
<button (click)="showContact()">Contact</button>
<router-outlet></router-outlet>
<br/> <br/>
<hr/>
<br/>
<!-- // back button - method to handle optional parameters and show current clicked department highlighted -->
<button (click)="goToDepartments()" class="button-sub">Back</button>
Syntax & Example: department-details.component.ts
import {Component, OnInit} from '@angular/core';
import {ActivatedRoute, Router, ParamMap} from '@angular/router';

@Component({
  selector: 'app-department-details',
  templateUrl: './department-details.component.html',
  styleUrls: ['./department-details.component.css']
})
export class DepartmentDetailsComponent implements OnInit {

  // to hold the currently passed id parameter
  public selectedDepartmentId;

  constructor(private activatedRoute: ActivatedRoute, private router: Router) {
  }

  ngOnInit() {
    // read the route parameter

    // snapshot approach
    // console.log(this.activatedRoute.snapshot.paramMap);
    // let routeParamId = parseInt(this.activatedRoute.snapshot.paramMap.get('id'));
    // this.selectedDepartmentId = routeParamId;

    // paramMap Observable approach
    this.activatedRoute.paramMap.subscribe((params: ParamMap) => {
      let id = parseInt(params.get('id')); // let id = Number(params.get('id'))
      this.selectedDepartmentId = id;
    })
  }

  /* Previous/Back button click */
  goPrevious() {
    let previousId = this.selectedDepartmentId - 1;
    this.router.navigate(['/departments', previousId]);
  }

  /* Next button click */
  goNext() {
    let nextId = this.selectedDepartmentId + 1;
    this.router.navigate(['/departments', nextId]);
  }

  // back button - method to handle optional parameters and show current department highlighted
  goToDepartments() {
    console.log('goToDepartments clicked');
    let currentSelectedId = this.selectedDepartmentId ? this.selectedDepartmentId : null
    //sending optional parameter - used for some logic
    //this.router.navigate(["/departments", { id: currentSelectedId, test: 'test-param-value' }])

    // relative path, links parameter array - {key:value}, {relativeTo property}
    // we can pass multiple parameters as per our requirements
    // this.router.navigate(['../', { id: currentSelectedId, name: 'Hello'  }]);
    this.router.navigate(['../', {id: currentSelectedId}], {relativeTo: this.activatedRoute});  // to the current route  append the department id and navigate to that URL
  }

  /* on overview button click */
  showOverview() {
    this.router.navigate(['overview'], {relativeTo: this.activatedRoute})
  }

  /* on contact button click */
  showContact() {
    this.router.navigate(['contact'], {relativeTo: this.activatedRoute})
  }

}
Angular Router Tutorial
The Angular Router is a powerful module that is used to handle navigation in an Angular application. It allows you to define different routes for different components, and display the appropriate component based on the current URL.
Here is an example of how to set up routing in an Angular application:
- First, you need to import the
RouterModuleandRoutesfrom the@angular/routerpackage in yourapp.module.tsfile:
import { RouterModule, Routes } from '@angular/router';
- Next, define an array of
Routesthat will be used to configure the router. Each route should have apathand acomponentproperty:
const routes: Routes = [
  { path: 'home', component: HomeComponent },
  { path: 'about', component: AboutComponent },
  { path: 'contact', component: ContactComponent },
  { path: '**', redirectTo: 'home', pathMatch: 'full' }
];
- In the
@NgModuledecorator, add theRouterModule.forRoot(routes)method in the imports array, this will configure the router with the routes you defined: ```log @NgModule({ imports: [RouterModule.forRoot(routes)], exports: [RouterModule] })
4. In your app's template, add a `<router-outlet>` element where the router should insert the component for the current route:
```log
 <router-outlet></router-outlet>
- Finally, to navigate to different routes, use the
routerLinkdirective on an anchor tag, you can use therouterLinkdirective to create links to different routes.<a routerLink="/home">Home</a> <a routerLink="/about">About</a> <a routerLink="/contact">Contact</a>
-
You can also use the
router.navigate()method in your component’s code to navigate to different routes programmatically. -
You can also pass parameters to the routes, like
{path: 'product/:id', component: ProductComponent}and then use the ActivatedRoute to access those parameters. -
This is just a basic example of how to set up routing in an Angular application. The Angular Router provides many more advanced features, such as child routes, guard, and resolver.
Setup of Angular Routing Tutorial
Step 1: Install The Angular Project.
Install Angular CLI globally on your system by typing the following command. npm install -g @angular/cli
Now, create one project called ngRouter. ng new ngRouter
Step 2: Make three components for the application.
-
Create one directory inside
src >> appfolder called components. - Next, make three components by typing the following command.
ng g c home ng g c about ng g c dashboard - It creates a separate folder inside
src >> appdirectory, we need to move all these three folders inside components folder for better project structure.
So, our app.module.ts file looks like this.
import { BrowserModule } from '@angular/platform-browser';
import { NgModule } from '@angular/core';
import { RouterModule } from '@angular/router';

import { AppComponent } from './app.component';
import { HomeComponent } from './home/home.component';
import { AboutComponent } from './about/about.component';
import { DashboardComponent } from './dashboard/dashboard.component';

@NgModule({
declarations: [
AppComponent,
HomeComponent,
AboutComponent,
DashboardComponent
],
imports: [
BrowserModule, RouterModule
],
providers: [],
bootstrap: [AppComponent]
})
export class AppModule { }
Step 3: Routing and Navigation.
The Angular Router enables navigation from one view to the next as users perform application tasks.
First, we need to import the routing modules inside our app.module.ts file.
// app.module.ts

import { RouterModule } from '@angular/router';

imports: [
BrowserModule, RouterModule
],
Configuration
When you have created the components, it’s by default path is different and now we have moved the components, so now its path is different. So, first, we need to change that path in app.module.ts file.
// app.module.ts

import { HomeComponent } from './components/home/home.component';
import { AboutComponent } from './components/about/about.component';
import { DashboardComponent } from './components/dashboard/dashboard.component';
Okay, now we need to configure the routes. So make one file inside app directory called routerConfig.ts file.
Write the following code in it.
// routerConfig.ts

import { Routes } from '@angular/router';
import { HomeComponent } from './components/home/home.component';
import { AboutComponent } from './components/about/about.component';
import { DashboardComponent } from './components/dashboard/dashboard.component';

const appRoutes: Routes = [
{ path: 'home',
component: HomeComponent
},
{
path: 'about',
component: AboutComponent
},
{ path: 'dashboard',
component: DashboardComponent
}
];
export default appRoutes;
We have defined one array and inside that array, we have registered the different routes with their components. Finally, we have exported it.
Now, import this object inside app.module.ts and register the module.
// app.module.ts

import appRoutes from './routerConfig';

imports: [
BrowserModule,
RouterModule.forRoot(appRoutes)
],
Step 4: Define the Router outlet.
In the app.component.html file, write the following code.
<!-- app.component.html  -->

<div style="text-align:center">
  <h1>
    Welcome to !!
  </h1>
  <nav>
    <a routerLink="home" routerLinkActive="active">Home</a>
    <a routerLink="about">About</a>
    <a routerLink="dashboard">Dashboard</a>
  </nav>
  <router-outlet></router-outlet>
</div>
Now, we have already changed the title inside app.component.ts file.
// app.component.ts

title = 'Angular Router Tutorial';
Start the app by the following command.
ng serve --open
After webpack compiles successfully, we can see the following page at the localhost
Code
- app.module.ts
import { BrowserModule } from '@angular/platform-browser';
import { NgModule } from '@angular/core';
import { RouterModule } from '@angular/router';

import { AppComponent } from './app.component';

import { HomeComponent } from './components/home/home.component';
import { AboutComponent } from './components/about/about.component';
import { DashboardComponent } from './components/dashboard/dashboard.component';

import { appRoutes } from './routerConfig';

@NgModule({
  declarations: [
    AppComponent,
    HomeComponent,
    AboutComponent,
    DashboardComponent
  ],
  imports: [
    BrowserModule, RouterModule.forRoot(appRoutes)
  ],
  providers: [],
  bootstrap: [AppComponent]
})
export class AppModule { }
- app.component.ts ```log import { Component } from ‘@angular/core’;
@Component({ selector: ‘app-root’, templateUrl: ‘./app.component.html’, styleUrls: [’./app.component.css’] }) export class AppComponent { title = ‘Angular Router Tutorial’; }
3. **app.component.html**
```log
<div style="text-align:center">
  <h1>
    Welcome to !!
  </h1>
  <nav>
    <a routerLink="home" routerLinkActive="active">Home</a>
    <a routerLink="about">About</a>
    <a routerLink="dashboard">Dashboard</a>
  </nav>
  <router-outlet></router-outlet>
</div>
- routerConfig.ts ```log // routerConfig.ts
import { Routes } from ‘@angular/router’; import { HomeComponent } from ‘./components/home/home.component’; import { AboutComponent } from ‘./components/about/about.component’; import { DashboardComponent } from ‘./components/dashboard/dashboard.component’;
export const appRoutes: Routes = [ { path: ‘home’, component: HomeComponent }, { path: ‘about’, component: AboutComponent }, { path: ‘dashboard’, component: DashboardComponent } ];
5. **about.component.html**
```log
<p>
  about works!
</p>
- home.component.html ```log
home works!
7. **dashboard.component.html**
```log
<p>
  dashboard works!
</p>