Elastic Load Balancers (ELB)
Table of contents
Elastic Load Balancers (ELB)
Elastic Load Balancing automatically distributes incoming application traffic across multiple targets, such as Amazon EC2 instances, Docker containers, IP addresses, and Lambda functions. It can handle the varying load of your application traffic in a single Availability Zone or across multiple Availability Zones. Elastic Load Balancing offers three types of load balancers that all feature the high availability, automatic scaling, and robust security necessary to make your applications fault tolerant.
ELB Key Details
- Load balancers can be internet facing or application internal.
- To route domain traffic to an ELB load balancer, use Amazon Route 53 to create an Alias record that points to your load balancer. An Alias record is preferable over a CName, but both can work.
- ELBs do not have predefined IPv4 addresses; you must resolve them with DNS instead. Your load balancer will never have its own IP by default, but you can create a static IP for a network load balancer because network LBs are for high performance purposes.
- Instances behind the ELB are reported as
InServiceorOutOfService. When an EC2 instance behind an ELB fails a health check, the ELB stops sending traffic to that instance. - A dual stack configuration for a load balancer means load balancing over IPv4 and IPv6
- In AWS, there are three types of LBs:
- Application LBs
- Network LBs
- Classic LBs.
- Application LBs are best suited for HTTP(S) traffic and they balance load on layer 7 OSI. They are intelligent enough to be application aware and Application Load Balancers also support path-based routing, host-based routing and support for containerized applications. As an example, if you change your web browser’s language into French, an Application LB has visibility of the metadata it receives from your browser which contains details about the language you use. To optimize your browsing experience, it will then route you to the French-language servers on the backend behind the LB. You can also create advanced request routing, moving traffic into specific servers based on rules that you set yourself for specific cases.
- Network LBs are best suited for TCP traffic where performance is required and they balance load on layer 4. They are capable of managing millions of requests per second while maintaining extremely low latency.
- Classic LBs are the legacy ELB product and they balance either on HTTP(S) or TCP, but not both. Even though they are the oldest LBs, they still support features like sticky sessions and X-Forwarded-For headers.
- If you need flexible application management and TLS termination then you should use the Application Load Balancer. If extreme performance and a static IP is needed for your application then you should use the Network Load Balancer. If your application is built within the EC2 Classic network then you should use the Classic Load Balancer.
- The lifecycle of a request to view a website behind an ELB:
- The browser requests the IP address for the load balancer from DNS.
- DNS provides the IP.
- With the IP at hand, your browser then makes an HTTP request for an HTML page from the Load Balancer.
- AWS perimeter devices checks and verifies your request before passing it onto the LB.
- The LB finds an active webserver to pass on the HTTP request.
- The webserver returns the requested HTML file.
- The browser receives the HTML file it requested and renders the graphical representation of it on the screen.
- Load balancers are a regional service. They do not balance load across different regions. You must provision a new ELB in each region that you operate out of.
- If your application stops responding, you’ll receive a 504 error when hitting your load balancer. This means the application is having issues and the error could have bubbled up to the load balancer from the services behind it. It does not necessarily mean there’s a problem with the LB itself.
ELB Advanced Features
- To enable IPv6 DNS resolution, you need to create a second DNS resource record so that the ALIAS AAAA record resolves to the load balancer along with the IPv4 record.
- The X-Forwarded-For header, via the Proxy Protocol, is simply the idea for load balancers to forward the requester’s IP address along with the actual request for information from the servers behind the LBs. Normally, the servers behind the LBs only see that the IP sending it traffic belongs to the Load Balancer. They usually have no idea about the true origin of the request as they only know about the computer (the LB) that asks them to do something. But sometimes we may want to route the original IP to the backend servers for specific use cases and have the LB’s IP address ignored. The X-Forwarded-For header makes this possible.
- Sticky Sessions bind a given user to a specific instance throughout the duration of their stay on the application or website. This means all of their interactions with the application will be directed to the same host each time. If you need local disk for your application to work, sticky sessions are great as users are guaranteed consistent access to the same ephemeral storage on a particular instance. The downside of sticky sessions is that, if done improperly, it can defeat the purpose of load balancing. All traffic could hypothetically be bound to the same instance instead of being evenly distributed.
- Path Patterns create a listener with rules to forward requests based on the URL path set within those user requests. This method, known as path-based routing, ensures that traffic can be specifically directed to multiple back-end services. For example, with Path Patterns you can route general requests to one target group and requests to render images to another target group. So the URL, “www.example.com/” will be forwarded to a server that is used for general content while “www.example.com/photos” will be forwarded to another server that renders images.
ELB Cross Zone Load Balancing
- Cross Zone load balancing guarantees even distribution across AZs rather than just within a single AZ.
- If Cross Zone load balancing is disabled, each load balancer node distributes requests evenly across the registered instances in its Availability Zone only.
- Cross Zone load balancing reduces the need to maintain equivalent numbers of instances in each enabled Availability Zone, and improves your application’s ability to handle the loss of one or more instances.
- However, it is still recommend that you maintain approximately equivalent numbers of instances in each enabled Availability Zone for higher fault tolerance.
- For environments where clients cache DNS lookups, incoming requests might favor one of the Availability Zones. Using Cross Zone load balancing, this imbalance in the request load is spread across all available instances in the region instead.
ELB Security
- ELB supports SSL/TLS & HTTPS termination. Termination at load balancer is desired because decryption is resource and CPU intensive. Putting the decryption burden on the load balancer enables the EC2 instances to spend their processing power on application tasks, which helps improve overall performance.
- Elastic Load Balancers (along with CloudFront) support Perfect Forward Secrecy. This is a feature that provides additional safeguards against the eavesdropping of encrypted data in transit through the use of a uniquely random session key. This is done by ensuring that the in-use part of an encryption system automatically and frequently changes the keys it uses to encrypt and decrypt information. So if this latest key is compromised at all, it will only expose a small portion of the user’s recent data.
- Classic Load Balancers do not support Server Name Indication (SNI). SNI allows the server (the LB in this case) to safely host multiple TLS Certificates for multiple sites all under a single IP address (the Alias record or CName record in this case). To allow SNI, you have to use an Application Load Balancer instead or use it with a CloudFront web distribution.
Auto Scaling
Auto Scaling Simplified
AWS Auto Scaling lets you build scaling plans that automate how groups of different resources respond to changes in demand. You can optimize availability, costs, or a balance of both. AWS Auto Scaling automatically creates all of the scaling policies and sets targets for you based on your preference.
Auto Scaling Key Details
- Auto Scaling is a major benefit from the cloud’s economies of scale so if you ever have a requirement for scaling, automatically think of using the Auto Scaling service.
- Auto Scaling has three components:
- Groups: These are logical components. A webserver group of EC2 instances, a database group of RDS instances, etc.
- Configuration Templates: Groups use a template to configure and launch new instances to better match the scaling needs. You can specify information for the new instances like the AMI to use, the instance type, security groups, block devices to associate with the instances, and more.
- Scaling Options: Scaling Options provides several ways for you to scale your Auto Scaling groups. You can base the scaling trigger on the occurrence of a specified condition or on a schedule.
- The following image highlights the state of an Auto scaling group. The orange squares represent active instances. The dotted squares represent potential instances that can and will be spun up whenever necessary. The minimum number, the maximum number, and the desired capacity of instances are all entirely configurable.

- When you use Auto Scaling, your applications gain the following benefits:
- Better fault tolerance: Auto Scaling can detect when an instance is unhealthy, terminate it, and launch an instance to replace it. You can also configure Auto Scaling to use multiple Availability Zones. If one Availability Zone becomes unavailable, Auto Scaling can launch instances in another one to compensate.
- Better availability: Auto Scaling can help you ensure that your application always has the right amount of capacity to handle the current traffic demands.
- When it comes to actually scale your instance groups, the Auto Scaling service is flexible and can be done in various ways:
- Auto Scaling can scale based on the demand placed on your instances. This option automates the scaling process by specifying certain thresholds that, when reached, will trigger the scaling. This is the most popular implementation of Auto Scaling.
- Auto Scaling can ensure the current number of instances at all times. This option will always maintain the number of servers you want running even when they fail.
- Auto Scaling can scale only with manual intervention. If you want to control all of the scaling yourself, this option makes sense.
- Auto Scaling can scale based on a schedule. If you can reliably predict spikes in traffic, this option makes sense.
- Auto Scaling based off of predictive scaling. This option lets AWS AI/ML learn more about your environment in order to predict the best time to scale for both performance improvements and cost-savings.
- In maintaining the current running instance, Auto Scaling will perform occasional health checks on the running instances to ensure that they are all healthy. When the service detects that an instance is unhealthy, it will terminate that instance and then bring up a new one online.
- When designing HA for your Auto Scaling, use multiple AZs and multiple regions wherever you can.
- Auto Scaling allows you to suspend and then resume one or more of the Auto Scaling processes in your Auto Scaling Group. This can be very useful when you want to investigate a problem in your application without triggering the Auto Scaling process when making changes.
- You can specify your launch configuration with multiple Auto Scaling groups. However, you can only specify one launch configuration for an Auto Scaling group at a time.
- You cannot modify a launch configuration after you’ve created it. If you want to change the launch configuration for an Auto Scaling group, you must create a new launch configuration and update your Auto Scaling group to inherit this new launch configuration.
Auto Scaling Default Termination Policy
- The default termination policy for an Auto Scaling Group is to automatically terminate a stopped instance, so unless you’ve configured it to do otherwise, stopping an instance will result in termination regardless if you wanted that to happen or not. A new instance will be spun up in its place.
- The default termination policy will spare instances that you tell it in case some servers are running critical systems or applications. These critical servers are protected from “scale in”, which is just the deletion process of instances deemed superfluous to requirements.
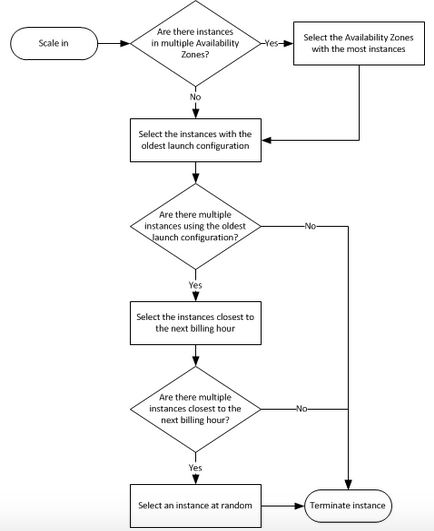
- The default termination policy is designed to help ensure that your network architecture spans Availability Zones evenly. With the default termination policy, the behavior of the Auto Scaling group is as follows:
- If there are instances in multiple Availability Zones, it will terminate an instance from the Availability Zone with the most instances. If there is more than one Availability Zone with the same max number of instances, it will choose the Availability Zone where instances use the oldest launch configuration.
- It will then determine which unprotected instances in the selected Availability Zone use the oldest launch configuration. If there is one such instance, it will terminate it.
- If there are multiple instances to terminate, it will determine which unprotected instances are closest to the next billing hour. (This helps you maximize the use of your EC2 instances and manage your Amazon EC2 usage costs.) If there are some instances that match this criteria, they will be terminated.
- This flow chart can provide further clarity on how the default Auto Scaling policy decides which instances to delete:
Auto Scaling Cooldown Period
- The cooldown period is a configurable setting for your Auto Scaling Group that helps to ensure that it doesn’t launch or terminate additional instances before the previous scaling activity takes effect.
- After the Auto Scaling Group scales using a policy, it waits for the cooldown period to complete before resuming further scaling activities if needed.
- The default waiting period is 300 seconds, but this can be modified.