Spring MVC
Table of contents
- Introduction to Spring MVC
- Spring MVC flow
- Spring Web Annotations
- @RequestMapping
- @RequestBody
- @PathVariable
- @RequestParam
- @ResponseBody
- @ExceptionHandler
- @ResponseStatus
- @Controller
- @RestController
- @ModelAttribute
- @CrossOrigin
- @Autowired
- @Inject vs @Autowired
- @Validated
- @Valid vs @Validated
- Component Scanning
- @ComponentScan
- @ComponentScan Without Arguments
- @ComponentScan With Arguments
- @ComponentScan with Exclusions
- @ComponentScan in a Spring-Boot application
- Difference between @Component, @Repository & @Service annotations?
- @Repository
- @Service
- @Controller
- Scheduler in cluster environment or run on multiple instances
- Reference Links
Introduction to Spring MVC
Spring MVC framework is a robust Model view controller framework which helps us to develop a loosely coupled web application. It separates different aspects of web applications with the help of MVC architecture.
Model: Model carries application data. It generally includes POJO in the form of business objects
View: View is used to render User interface (UI). It will render application data on UI. For example JSP
Controller: Controller takes care of processing user request and calling back end services.
It has a central servlet called as DispatcherServlet which is well known as front controller that intercepts all the requests, identify the appropriate handler i.e. controllers and render views to the client.
It is defined at org.springframework.web.servlet.DispatcherServlet in org.springframework.web package.
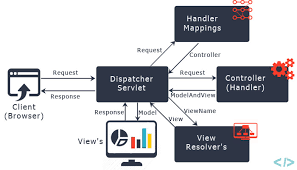
Spring MVC flow
In Spring Web MVC, DispatcherServlet class works as the front controller. It is responsible to manage the flow of the spring mvc application.
The @Controller annotation is used to mark the class as the controller in Spring 3.
The @RequestMapping annotation is used to map the request url. It is applied on the method.
Spring MVC Execution Flow
- Step 1: First request will be received by DispatcherServlet.
- Step 2: DispatcherServlet will take the help of HandlerMapping and get to know the Controller class name associated with the given request.
- Step 3: So request transfer to the Controller, and then controller will process the request by executing appropriate methods and returns ModelAndView object (contains Model data and View name) back to the DispatcherServlet.
- Step 4: Now DispatcherServlet send the model object to the ViewResolver to get the actual view page.
- Step 5: Finally DispatcherServlet will pass the Model object to the View page to display the result.
Spring Web Annotations
@RequestMapping
it can be configured using:
- path, or its aliases, name, and value: which URL the method is mapped to
- method: compatible HTTP methods
- params: filters requests based on presence, absence, or value of HTTP parameters
- headers: filters requests based on presence, absence, or value of HTTP headers
- consumes: which media types the method can consume in the HTTP request body
- produces: which media types the method can produce in the HTTP response body
Example:
@Controller
class VehicleController {

    @RequestMapping(value = "/vehicles/home", method = RequestMethod.GET)
    String home() {
        return "home";
    }
}
this configuration has the same effect :
@Controller
@RequestMapping(value = "/vehicles", method = RequestMethod.GET)
class VehicleController {

    @RequestMapping("/home")
    String home() {
        return "home";
    }
}
Moreover, @GetMapping, @PostMapping, @PutMapping, @DeleteMapping, and @PatchMapping are different variants of @RequestMapping with the HTTP method already set to GET, POST, PUT, DELETE, and PATCH respectively.
These are available since Spring 4.3 release.
@RequestBody
maps the body of the HTTP request to an object.The deserialization is automatic and depends on the content type of the request.
@PostMapping("/save")
void saveVehicle(@RequestBody Vehicle vehicle) {
    // ...
}
@PathVariable
This annotation indicates that a method argument is bound to a URI template variable. We can specify the URI template with the @RequestMapping annotation and bind a method argument to one of the template parts with @PathVariable.
We can achieve this with the name or its alias, the value argument:
@RequestMapping("/{id}")
Vehicle getVehicle(@PathVariable("id") long id) {
    // ...
}
If the name of the part in the template matches the name of the method argument, we don’t have to specify it in the annotation:
@RequestMapping("/{id}")
Vehicle getVehicle(@PathVariable long id) {
    // ...
}
Moreover, we can mark a path variable optional by setting the argument required to false:
@RequestMapping("/{id}")
Vehicle getVehicle(@PathVariable(required = false) long id) {
    // ...
}
@RequestParam
We use @RequestParam for accessing HTTP request parameters:
@RequestMapping
Vehicle getVehicleByParam(@RequestParam("id") long id) {
    // ...
}
It has the same configuration options as the @PathVariable annotation.
In addition to those settings, with @RequestParam we can specify an injected value when Spring finds no or empty value in the request. To achieve this, we have to set the defaultValue argument.
Providing a default value implicitly sets required to false:
@RequestMapping("/buy")
Car buyCar(@RequestParam(defaultValue = "5") int seatCount) {
    // ...
}
Response Handling Annotations
@ResponseBody
If we mark a request handler method with @ResponseBody, Spring treats the result of the method as the response itself:
@ResponseBody
@RequestMapping("/hello")
String hello() {
    return "Hello World!";
}
@ExceptionHandler
With this annotation, we can declare a custom error handler method. Spring calls this method when a request handler method throws any of the specified exceptions.
The caught exception can be passed to the method as an argument:
@ExceptionHandler(IllegalArgumentException.class)
void onIllegalArgumentException(IllegalArgumentException exception) {
    // ...
}
@ResponseStatus
We can specify the desired HTTP status of the response if we annotate a request handler method with this annotation. We can declare the status code with the code argument, or its alias, the value argument.
Also, we can provide a reason using the reason argument.
We also can use it along with @ExceptionHandler:
@ExceptionHandler(IllegalArgumentException.class)
@ResponseStatus(HttpStatus.BAD_REQUEST)
void onIllegalArgumentException(IllegalArgumentException exception) {
    // ...
}
Other Web Annotations
@Controller
We can define a Spring MVC controller with @Controller.@Controller is a class level annotation which tells the Spring Framework that this class serves as a controller in Spring MVC:
@Controller
public class VehicleController {
    // ...
}
@RestController
The @RestController combines @Controller and @ResponseBody.
@Controller
@ResponseBody
class VehicleRestController {
    // ...
}
is same as :
@RestController
class VehicleRestController {
    // ...
}
@ModelAttribute
With this annotation we can access elements that are already in the model of an MVC @Controller, by providing the model key:
@PostMapping("/assemble")
void assembleVehicle(@ModelAttribute("vehicle") Vehicle vehicleInModel) {
    // ...
}
Like with @PathVariable and @RequestParam, we don’t have to specify the model key if the argument has the same name:
@PostMapping("/assemble")
void assembleVehicle(@ModelAttribute Vehicle vehicle) {
    // ...
}
Besides, @ModelAttribute has another use: if we annotate a method with it, Spring will automatically add the method’s return value to the model:
@ModelAttribute("vehicle")
Vehicle getVehicle() {
    // ...
}
Like before, we don’t have to specify the model key, Spring uses the method’s name by default:
@ModelAttribute
Vehicle vehicle() {
    // ...
}
Before Spring calls a request handler method, it invokes all @ModelAttribute annotated methods in the class.
@CrossOrigin
@CrossOrigin enables cross-domain communication for the annotated request handler methods: If we mark a class with it, it applies to all request handler methods in it.
@CrossOrigin
@RequestMapping("/hello")
String hello() {
    return "Hello World!";
}
@Autowired
Since version 2.5, Spring provides the @Autowired annotation to discover the beans automatically and inject collaborating beans (other associated dependent beans) into our bean.
By declaring all the beans in Spring Configuration file, Spring container can autowire relationships between collaborating beans.
After enabling annotation based injection, now we can use @Autowired annotation. @Autowired can be used on following injection points.
- Constructors
- Methods
- Fields and
- Parameters
and dependencies can be injected using by type OR by name OR by @Qualifier.
In spring there are two types of autowiring. Those are
- Autowiring by type : @Autowired by type uses the class type to autowire the spring boot bean class. The bean is autowired based on the type of the variable.
- Autowiring by name : For Autowiring by name, the name of the variable is used for the dependency injection. The name of the authoring variable should be the same as the name of the class or the bean name configured in the @Component annotation.
For example,
public interface Shape {
	public void draw();
}

@Component
public class Rectangle implements Shape {
	@Override
	public void draw() {
		System.out.println(">>>>>>>>>>>>>INVOKING THE RECTANGLE INSTANCE<<<<<<<<<<<<<<<<");
	}
}

@Component
public class Circle implements Shape{
	@Override
	public void draw() {
		System.out.println(">>>>>>>>>>>>>INVOKING THE CIRCLE INSTANCE<<<<<<<<<<<<<<<<");
	}
}
the shape interface is implemented by two classes Circle and Rectangle. So we can say both are instances of Shape or both shape. It made Rectangle and Circle as spring beans using the annotation @Component. Now let’s see how to autowire these beans in another class.
@Component
public class ShapeService {
	@Autowired
	private Shape rectangle;//by name

	@Autowired
	private Rectangle myRectangle;//by type

}
Here in ShapeService class, it is autowring the shape Rectangle in two ways.
- Here in the first @Autowiring, the variable rectangle is autowired based on the name of the variable. Here when the spring checks the type of the variable, he can see it is Shape. But there are two shape implementations are there Rectangle and Circle. So spring doesn’t get a proper solution for what component need to autowire. Then the spring check the name of the variable(rectangle) and find out any Shape component with the same name is available. Yes…The Rectangle component is available. So the spring will inject the property with rectangle component.
- In the second @Autowiring, the type of property is Rectangle. So the spring directly injects the Rectangle component to the property myRectangle.
@Inject vs @Autowired
| Key | @Inject | @Autowired |
|---|---|---|
| Basic | It is part of Java CDI(Contexts and Dependency Injection) | It is part of Spring framework |
| Required | It has no required attribute | It has required attribute |
| Default Scope | Default scope of the autowired beans is Singleton | Default scope of the inject beans is prototype |
| Ambiguity | In case of ambiguity in beans for injection then @Named qualifier should be added in your code. | In case of ambiguity in beans for injection then @Qualifer qualifier should be added in your code. |
| Advantage | It is a part of Java CDI so it is not dependent on any DI framework. It makes your system loosely coupled. | It makes your application tightly coupled with Spring framework. In the future , if you want to move to another DI framework then you need reconfigure your application. |
@Validated
@Validated annotation activates the Spring Validation AOP interceptor and it will examine method parameters to see if they have any validation annotations on them, if they do then Spring will call hibernate validator with each specific annotation for example @Size(min = 8) String password means call hibernate size validator and pass the value of the parameter password in this case hibernate validator does not need to scan java.lang.String to see if it has validation annotations on it. @Validated works on any spring @Component you can use it on @Service classes for example.
@Valid vs @Validated
In Spring, we use JSR-303’s @Valid annotation for method level validation. We also use it to mark a member attribute for validation. However, this annotation doesn’t support group validation.
Groups help to limit the constraints applied during validation. One particular use case is UI wizards. In the first step, we may have a certain sub-group of fields. In the subsequent step, there may be another group belonging to the same bean. So we need to apply constraints on these limited fields in each step, but @Valid doesn’t support this.
In this case, for group-level, we have to use Spring’s @Validated, which is a variant of JSR-303’s @Valid. This is used at the method-level. For marking member attributes, we continue to use the @Valid annotation.
Component Scanning
To do dependency injection, Spring creates a so-called application context.
During startup, Spring instantiates objects and adds them to the application context. Objects in the application context are called “Spring beans” or “components”.
Spring resolves dependencies between Spring beans and injects Spring beans into other Spring beans’ fields or constructors.
The process of searching the classpath for classes that should contribute to the application context is called component scanning.
When developing Spring Boot applications, you need to tell the Spring Framework where to look for Spring components. Using component scan is one method of asking Spring to detect Spring managed components. Spring needs the information to locate and register all the Spring components with the application context when the application starts.
Spring can auto scan, detect, and instantiate components from pre-defined project packages. It can auto scan all classes annotated with the stereotype annotations @Component @Controller, @Service and @Repository
@ComponentScan
@ComponentScan tells Spring in which packages you have annotated classes which should be managed by Spring. So, for example, if you have a class annotated with @Controller which is in a package which is not scanned by Spring, you will not be able to use it as Spring controller.
Classes annotated with @Configuration is a new way of configuring Spring using annotations instead of XML files (it’s called Java configuration). Spring needs to know which packages contain spring beans, otherwise you would have to register each bean individually. That’s what @ComponentScan is used for.
@ComponentScan Without Arguments
we use the @ComponentScan annotation along with the @Configuration annotation to specify the packages that we want to be scanned. @ComponentScan without arguments tells Spring to scan the current package and all of its sub-packages.
@Configuration
@ComponentScan
public class DemoAppConfig {
    //...
}
@ComponentScan With Arguments
@Configuration
@ComponentScan(basePackages = {"basic.ioc.autowire", "basic.ioc.setter"})
public class AutowireBeanConfig {
    //other configs
}
@ComponentScan with Exclusions
Use a filter,with the pattern for the classes to exclude:
    @Configuration
@ComponentScan(basePackages = "com.demo",
        includeFilters = @Filter(type = FilterType.REGEX, pattern = ".*Dao"),
        excludeFilters = @Filter(Repository.class))
public class AppConfig {
        ...
}
@ComponentScan in a Spring-Boot application
Spring-Boot application, we don’t need to specify the @Configuration annotation unless we want more control over the classpath scanning. This is because of the @SpringBootApplication , which is already a combination of below listed three annotations.
- @Configuration
- @EnableAutoConfiguration
- @ComponentScan
Difference between @Component, @Repository & @Service annotations?
From Spring Documentation:
Spring provides stereotype annotations: @Component, @Service, and @Controller. @Component is a generic stereotype for any Spring-managed component. @Repository, @Service, and @Controller are specializations of @Component for more specific use cases (in the persistence, service, and presentation layers, respectively). Therefore, you can annotate your component classes with @Component, but, by annotating them with @Repository, @Service, or @Controller instead, your classes are more properly suited for processing by tools or associating with aspects.
@Repository
stereotype for persistence layer
@Repository’s job is to catch persistence-specific exceptions and re-throw them as one of Spring’s unified unchecked exceptions.
For this, Spring provides PersistenceExceptionTranslationPostProcessor, which we are required to add in our application context (already included if we’re using Spring Boot):
<bean class="org.springframework.dao.annotation.PersistenceExceptionTranslationPostProcessor"/>
This bean post processor adds an advisor to any bean that’s annotated with @Repository.
@Service
stereotype for service layer
We mark beans with @Service to indicate that they’re holding the business logic. Besides being used in the service layer, there isn’t any other special use for this annotation.
@Controller
stereotype for presentation layer (spring-mvc)
Instead of using @Component on a controller class in Spring MVC, we use @Controller, which is more readable and appropriate.
By using that annotation we do two things, first, we declare that this class is a Spring bean and should be created and maintained by Spring ApplicationContext, but also we indicate that its a controller in MVC setup. This latter property is used by web-specific tools and functionalities.
For example, DispatcherServlet will look for @RequestMapping on classes that are annotated using @Controller but not with @Component.
This means @Component and @Controller are the same with respect to bean creation and dependency injection but later is a specialized form of former. Even if you replace @Controller annotation with @Compoenent, Spring can automatically detect and register the controller class but it may not work as you expect with respect to request mapping.
Scheduler in cluster environment or run on multiple instances
Spring provides an easy to implement API for scheduling jobs. It works great until we deploy multiple instances of our application. Spring, by default, cannot handle scheduler synchronization over multiple instances – it executes the jobs simultaneously on every node instead.
In this short tutorial, we’ll look at ShedLock – a Java library that makes sure our scheduled tasks run only once at the same time and is an alternative to Quartz.
Spring Scheduled Task running in clustered environment with ShedLock
To use ShedLock with Spring, we need to add the shedlock-spring dependency:
<dependency>
    <groupId>net.javacrumbs.shedlock</groupId>
    <artifactId>shedlock-spring</artifactId>
    <version>2.2.0</version>
</dependency>
Configuration
ShedLock works only in environments with a shared database by declaring a proper LockProvider. It creates a table or document in the database where it stores the information about the current locks.
For this example,we can usein-memory H2 database.We need to provide the H2 database and the ShedLock’s JDBC dependency:
<dependency>
    <groupId>net.javacrumbs.shedlock</groupId>
    <artifactId>shedlock-provider-jdbc-template</artifactId>
    <version>2.1.0</version>
</dependency>
<dependency>
<groupId>com.h2database</groupId>
<artifactId>h2</artifactId>
<version>1.4.200</version>
</dependency>
Next, we need to create a database table for ShedLock to keep information about scheduler locks:
CREATE TABLE shedlock (
   name VARCHAR(64),
   lock_until TIMESTAMP(3) NULL,
   locked_at TIMESTAMP(3) NULL,
   locked_by VARCHAR(255),
   PRIMARY KEY (name)
)
application.yaml file configuration:
spring:
    datasource:
        driverClassName: org.h2.Driver
        url: jdbc:h2:mem:shedlock_DB;INIT=CREATE SCHEMA IF NOT EXISTS shedlock;DB_CLOSE_DELAY=-1;DB_CLOSE_ON_EXIT=FALSE
        username: sa
        password:
SchedulerConfiguration.java:
@Configuration
public class SchedulerConfiguration {
    @Bean
    public LockProvider lockProvider(DataSource dataSource) {
        return new JdbcTemplateLockProvider(dataSource);
    }
}
Application.java:
@SpringBootApplication
@EnableScheduling
@EnableSchedulerLock(defaultLockAtMostFor = "PT30S")
public class Application {

    public static void main(String[] args) {
        SpringApplication.run(SpringApplication.class, args);
    }
}
Creating Tasks
To create a scheduled task handled by ShedLock, we simply put the @Scheduled and @SchedulerLock annotations on a method:
TaskScheduler.java:
@Component
class TaskScheduler {

    @Scheduled(cron = "0 0/15 * * * ?")
    @SchedulerLock(name = "TaskScheduler_scheduledTask",
            lockAtLeastForString = "PT5M", lockAtMostForString = "PT14M")
    public void scheduledTask() {
        // ...
    }
}
@Scheduled supports the cron format, with this expression meaning “every 15 minutes”.
Next, taking a look at @SchedulerLock, the name parameter has to be unique, and ClassName_methodName is typically enough to achieve that. We don’t want more than one run of this method happening at the same time, and ShedLock uses the unique name to achieve that.
First, we’ve added lockAtLeastForString so that we can put some distance between method invocations. Using “PT5M” means that this method will hold the lock for 5 minutes, at a minimum. In other words, that means that this method can be run by ShedLock no more often than every five minutes.
Next, we added lockAtMostForString to specify how long the lock should be kept in case the executing node dies. Using PT14M means that it will be locked for no longer than 14 minutes.
In normal situations, ShedLock releases the lock directly after the task finishes. Now, we didn’t have to do that because there is a default provided in @EnableSchedulerLock, but we’ve chosen to override that here.
Execute a Quartz Job only once in a multi-instance environment
You have to configure Quartz to run in a clustered environment. Clustering currently only works with the JDBC jobstore, and works by having each node of the cluster to share the same database.
- Set the org.quartz.jobStore.isClustered property to true if you have multiple instances of Quartz that use the same set of database tables. This property is used to turn on the clustering features.
- Set the org.quartz.jobStore.clusterCheckinInterval property (milliseconds) which is the frequency at which this instance checks in with the other instances of the cluster.
- Set the org.quartz.scheduler.instanceId to AUTO so that each node in the cluster will have a unique instanceId.
Each instance in the cluster should use the same copy of the quartz.properties file. If you use clustering on separate machines ensure that their clocks are synchronized.
Example Properties For A Clustered Scheduler
#============================================================================
# Configure Main Scheduler Properties
#============================================================================

org.quartz.scheduler.instanceName = MyClusteredScheduler
org.quartz.scheduler.instanceId = AUTO

#============================================================================
# Configure ThreadPool
#============================================================================

org.quartz.threadPool.class = org.quartz.simpl.SimpleThreadPool
org.quartz.threadPool.threadCount = 25
org.quartz.threadPool.threadPriority = 5

#============================================================================
# Configure JobStore
#============================================================================

org.quartz.jobStore.misfireThreshold = 60000

org.quartz.jobStore.class = org.quartz.impl.jdbcjobstore.JobStoreTX
org.quartz.jobStore.driverDelegateClass = org.quartz.impl.jdbcjobstore.oracle.OracleDelegate
org.quartz.jobStore.useProperties = false
org.quartz.jobStore.dataSource = myDS
org.quartz.jobStore.tablePrefix = QRTZ_

org.quartz.jobStore.isClustered = true
org.quartz.jobStore.clusterCheckinInterval = 20000

#============================================================================
# Configure Datasources
#============================================================================

org.quartz.dataSource.myDS.driver = oracle.jdbc.driver.OracleDriver
org.quartz.dataSource.myDS.URL = jdbc:oracle:thin:@polarbear:1521:dev
org.quartz.dataSource.myDS.user = quartz
org.quartz.dataSource.myDS.password = quartz
org.quartz.dataSource.myDS.maxConnections = 5
org.quartz.dataSource.myDS.validationQuery=select 0 from dual