React Components
Table of contents
- React Components
- Component and Container
- import and export components
- declarative and imperative
- Element and Component
- conditionally render components
- conditionally add attributes
- revent a component from rendering?
- use StrictMode component
- avoid using setState() after a component has been unmounted?
- Lifting State Up?
- “Children” in React?
- Compound Components
- Functional Components
- Class Components
- Recommended ordering of methods in class component
- Create a dynamic table
- Prevent component from rendering
- Set a timer to update every second
- Stateful and stateless components
- Purpose of using super constructor with props argument
- Element, Component and Component instance
- What does shouldComponentUpdate do and why is it important
- Purpose of render() function
- REACT LIFECYCLE
- Different phases of React component lifecycle
- Make component to perform an action only once when the component initially rendered
- Rendering a list of components from an array of data
- useEffect() vs componentDidMount()
- component constructor called only once?
- componentDidMount() and componentWillMount()
- Good to use setState() in componentWillMount() method?
- componentWillUnmount() with Functional Components
- Pure Components
- Higher Order Components HOC
- Lazy Loading
React Components
Components are the building blocks of any React app and a typical React app will have many of these. Simply put, a component is a JavaScript class or function that optionally accepts inputs i.e. properties(props) and returns a React element that describes how a section of the UI (User Interface) should appear.
In React, a Stateful Component is a component that holds some state. A Stateless component, by contrast, has no state. Note that both types of components can use props.
1. Stateless Component:
import React from 'react'

const ExampleComponent = (props) => {
    return <h1>Stateless Component - {props.message}</h1>;
};

const App = () => {
  const message = 'React Interview Questions'
  return (
    <div>
      <ExampleComponent message={message} />
    </div>
  );
};

export default App;
The above example shows a stateless component named ExampleComponent which is inserted in the <App/> component. The ExampleComponent just comprises of a <h1> element. Although the Stateless component has no state, it still receives data via props from a parent component.
2. Stateful Component:
import React, { useState } from 'react'

const ExampleComponent = (props) => {
  const [email, setEmail] = useState(props.defaultEmail)

  const changeEmailHandler = (e) => {
    setEmail(e.target.value)
  }

  return (
    <input type="text" value={email} onChange={changeEmailHandler} />
  );
}


const App = () => {
  const defaultEmail = "suniti.mukhopadhyay@gmail.com"
  return (
    <div>
      <ExampleComponent defaultEmail={defaultEmail} />
    </div>
  );
};

export default App;
The above example shows a stateful component named ExampleComponent which is inserted in the <App/> component. The ExampleComponent contains a <input>. First of all, in the ExampleComponent, we need to assign defaultEmail by props to a local state by a useState() hook in ExampleComponent.
Next, we have to pass email to value property of a input tag and pass a function changeEmailHandler to an onChange() event for a purpose keeping track of the current value of the input.
Component and Container
The presentational components are concerned with the look, container components are concerned with making things work.
For example, this is a presentational component. It gets data from its props, and just focuses on showing an element
/**
 * Presentational Component
 */
const Users = props => (
  <ul>
    {props.users.map(user => (
      <li>{user}</li>
    ))}
  </ul>
)
On the other hand this is a container component. It manages and stores its own data, and uses the presentational component to display it.
/**
 * Container Component
 */
class UsersContainer extends React.Component {
  constructor() {
    this.state = {
      users: []
    }
  }

  componentDidMount() {
    axios.get('/users').then(users =>
      this.setState({ users: users }))
    )
  }

  render() {
    return <Users users={this.state.users} />
  }
}
import and export components
// Importing combination
import React, { Component } from 'react';
import ReactDOM from 'react-dom';

// Wrapping components with braces if no default exports
import { Button }  from './Button';

// Default exports ( recommended )
import  Button  from './Button';

class DangerButton extends Component {
    render()
    {
        return <Button color="red" />;
    }
}

export default DangerButton;
// or export DangerButton;
By using default you express that's going to be member in that module which would be imported if no specific member name is provided. You could also express you want to import the specific member called DangerButton by doing so: import { DangerButton } from './comp/danger-button'; in this case, no default is needed
declarative and imperative
1. Imperative programming:
It is a programming paradigm that uses statements that change a program's state.
const string = "Hi there , I'm a web developer";
let removeSpace = "";
for (let i = 0; i < i.string.length; i++) {
  if (string[i] === " ") removeSpace += "-";
  else removeSpace += string[i];
}
console.log(removeSpace);
In this example, we loop through every character in the string, replacing spaces as they occur. Just looking at the code, it doesn't say much. Imperative requires lots of comments in order to understand code. Whereas in the declarative program, the syntax itself describes what should happen and the details of how things happen are abstracted way.
2. Declarative programming:
It is a programming paradigm that expresses the logic of a computation without describing its control flow.
Example:
const { render } = ReactDOM
const Welcome = () => (
  <div id="App">
    //your HTML code
    //your react components
  </div>
)
render(
<App />,
document.getElementById('root')
)
React is declarative. Here, the Welcome component describes the DOM that should be rendered. The render function uses the instructions declared in the component to build the DOM, abstracting away the details of how the DOM is to be rendered. We can clearly see that we want to render our Welcome component into the element with the ID of ‘target’.
Element and Component
1. React Element:
It is a simple object that describes a DOM node and its attributes or properties. It is an immutable description object and you can not apply any methods on it.
const element = <h1>React Element Example!</h1>;
ReactDOM.render(element, document.getElementById('app'));
2. React Component:
It is a function or class that accepts an input and returns a React element. It has to keep references to its DOM nodes and to the instances of the child components.
function Message() {
  return <h2>React Component Example!</h2>;
}
ReactDOM.render(<Message />, document.getElementById('app'));
conditionally render components
Conditional rendering is a term to describe the ability to render different user interface (UI) markup if a condition is true or false. In React, it allows us to render different elements or components based on a condition.
1. Element Variables:
You can use variables to store elements. This can help you conditionally render a part of the component while the rest of the output doesn't change.
function LogInComponent(props) {
  const isLoggedIn = props.isLoggedIn;
  if (isLoggedIn) {
    return <UserComponent />;
  }
  return <GuestComponent />;
}

ReactDOM.render(
  <LogInComponent isLoggedIn={false} />,
  document.getElementById('root')
);
2. Inline If-Else with Conditional Operator:
render() {
  const isLoggedIn = this.state.isLoggedIn;
  return (
    <div>
      {isLoggedIn
        ? <LogoutButton onClick={this.handleLogoutClick} />
        : <LoginButton onClick={this.handleLoginClick} />
      }
    </div>
  );
}
conditionally add attributes
Inline conditionals in attribute props
/**
 * Conditionally add attributes
 */
import React from "react";

export default function App() {
  const [mood] = React.useState("happy");

  const greet = () => alert("Hi there! :)");

  return (
    <button onClick={greet} disabled={"happy" === mood ? false : true}>
      Say Hi
    </button>
  );
}
revent a component from rendering?
React shouldComponentUpdate() is a performance optimization method, and it tells React to avoid re-rendering a component, even if state or prop values may have changed. This method only used when a component will stay static or pure.
The React shouldComponentUpdate() method return true if it needs to re-render or false to avoid being re-render.
Syntax:
shouldComponentUpdate(nextProps, nextState){ }
Example:
/**
 * Prevent a component from rendering
 */
export default class App extends React.Component {
  constructor() {
    super();
    this.state = {
      countOfClicks: 0
    };
    this.handleClick = this.handleClick.bind(this);
  }

  handleClick() {
    this.setState({
      countOfClicks: this.state.countOfClicks + 1
    });
  }

  shouldComponentUpdate(nextProps, nextState) {
    console.log("this.state.countOfClicks", this.state.countOfClicks);
    console.log("nextState.countOfClicks", nextState.countOfClicks);
    return true;
  }

  render() {
    return (
      <div>
        <h2>shouldComponentUpdate Example</h2>
        <p>Count of clicks: <b>{this.state.countOfClicks}</b></p>
        <button onClick={this.handleClick}>CLICK ME</button>
      </div>
    );
  }
}
use StrictMode component
The StrictMode is a tool for highlighting potential problems in an application. Like Fragment, StrictMode does not render any visible UI. It activates additional checks and warnings for its descendants.
Strict mode checks are run in development mode only; they do not impact the production build.
Example:
/**
 * StrictMode
 */
import { StrictMode } from "react";
import MyComponent from "./MyComponent";

export default function App() {
  return (
    <StrictMode>
      <MyComponent />
    </StrictMode>
  );
}
React StrictMode, in order to be efficient and avoid potential problems by any side-effects, needs to trigger some methods and lifecycle hooks twice. These are:
- Class component constructor() method
- The render() method
- setState() updater functions (the first argument)
- The static getDerivedStateFromProps() lifecycle
- React.useState() function
Benefits of StrictMode:
- Identifying components with unsafe lifecycles
- Warning about legacy string ref API usage
- Warning about deprecated findDOMNode usage
- Detecting unexpected side effects
- Detecting legacy context API
avoid using setState() after a component has been unmounted?
Calling setState() after a component has unmounted will emit a warning. The “setState warning” exists to help you catch bugs, because calling setState() on an unmounted component is an indication that your app/component has somehow failed to clean up properly.
Specifically, calling setState() in an unmounted component means that your app is still holding a reference to the component after the component has been unmounted - which often indicates a memory leak.
Example:
/**
 * setState() in unmounted component
 */
import React, { Component } from "react";
import axios from "axios";

export default class App extends Component {
  _isMounted = false; // flag to check Mounted

  constructor(props) {
    super(props);

    this.state = {
      news: []
    };
  }

  componentDidMount() {
    this._isMounted = true;

    axios
      .get("https://hn.algolia.com/api/v1/search?query=react")
      .then((result) => {
        if (this._isMounted) {
          this.setState({
            news: result.data.hits
          });
        }
      });
  }

  componentWillUnmount() {
    this._isMounted = false;
  }

  render() {
    return (
      <ul>
        {this.state.news.map((topic) => (
          <li key={topic.objectID}>{topic.title}</li>
        ))}
      </ul>
    );
  }
}
Here, even though the component got unmounted and the request resolves eventually, the flag in component will prevent to set the state of the React component after it got unmounted.
Lifting State Up?
The common approach to share state between two components is to move the state to common parent of the two components. This approach is called as lifting state up in React.js. With the shared state, changes in state reflect in relevant components simultaneously.
Example:
The App component containing PlayerContent and PlayerDetails component. PlayerContent shows the player name buttons. PlayerDetails shows the details of the in one line.
The app component contains the state for both the component. The selected player is shown once we click on the one of the player button.
/**
 * Lifting State Up
 */
import React from "react";
import PlayerContent from "./PlayerContent";
import PlayerDetails from "./PlayerDetails";

export default class App extends React.Component {
  constructor(props) {
    super(props);
    this.state = { selectedPlayer: [0, 0], playerName: "" };
    this.updateSelectedPlayer = this.updateSelectedPlayer.bind(this);
  }
  updateSelectedPlayer(id, name) {
    const arr = [0, 0, 0, 0];
    arr[id] = 1;
    this.setState({
      playerName: name,
      selectedPlayer: arr
    });
  }
  render() {
    return (
      <div>
        <PlayerContent
          active={this.state.selectedPlayer[0]}
          clickHandler={this.updateSelectedPlayer}
          id={0}
          name="Player 1"
        />
        <PlayerContent
          active={this.state.selectedPlayer[1]}
          clickHandler={this.updateSelectedPlayer}
          id={1}
          name="Player 2"
        />
        <PlayerDetails name={this.state.playerName} />
      </div>
    );
  }
}
/**
 * PlayerContent
 */
import React, { Component } from "react";

export default class PlayerContent extends Component {
  render() {
    return (
      <button
        onClick={() => {
          this.props.clickHandler(this.props.id, this.props.name);
        }}
        style=
      >
        {this.props.name}
      </button>
    );
  }
}
/**
 * PlayerDetails
 */
import React, { Component } from "react";

export default class PlayerDetails extends Component {
  render() {
    return <h2>{this.props.name}</h2>;
  }
}
“Children” in React?
In React, children refer to the generic box whose contents are unknown until they're passed from the parent component. Children allows to pass components as data to other components, just like any other prop you use.
The special thing about children is that React provides support through its ReactElement API and JSX. XML children translate perfectly to React children!
Example:
/**
 * Children in React
 */
const Picture = (props) => {
  return (
    <div>
      <img src={props.src}/>
      {props.children}
    </div>
  )
}
This component contains an <img> that is receiving some props and then it is displaying {props.children}. Whenever this component is invoked {props.children} will also be displayed and this is just a reference to what is between the opening and closing tags of the component.
/**
 * App.js
 */

render () {
  return (
    <div className='container'>
      <Picture key={picture.id} src={picture.src}>
          {/** what is placed here is passed as props.children **/}
      </Picture>
    </div>
  )
}
Compound Components
The Compound components are a pattern in which components are used together such that they share an implicit state that lets them communicate with each other in the background.
Internally they are built to operate on a set of data that is passed in through children instead of props. Behind the scenes they make use of React's lower level API such as React.children.map(), and React.cloneElement(). Using these methods, the component is able to express itself in such a way that promotes patterns of composition and extensibility.
Example:
function App() {
  return (
    <Menu>
      <MenuButton>
        Actions <span aria-hidden>▾</span>
      </MenuButton>
      <MenuList>
        <MenuItem onSelect={() => alert('Download')}>Download</MenuItem>
        <MenuItem onSelect={() => alert('Copy')}>Create a Copy</MenuItem>
        <MenuItem onSelect={() => alert('Delete')}>Delete</MenuItem>
      </MenuList>
    </Menu>
  )
}
In this example, the <Menu> establishes some shared implicit state. The <MenuButton>, <MenuList>, and <MenuItem> components each access and/or manipulate that state, and it's all done implicitly. This allows you to have the expressive API you’re looking for.
Functional Components
A React functional component is a simple JavaScript function that accepts props and returns a React element. It also referred as stateless components as it simply accept data and display them in some form.
After the introduction of React Hooks, writing functional components has become the standard way of writing React components in modern applications.
Example:
function Welcome(props) {
  return <h1>Hello, {props.name}</h1>;
}

const element = <Welcome name="World!" />;

ReactDOM.render(
  element,
  document.getElementById('root')
);
Class Components
The class component, a stateful/container component, is a regular ES6 class that extends the component class of the React library. It is called a stateful component because it controls how the state changes and the implementation of the component logic. Aside from that, they have access to all the different phases of a React lifecycle method.
Example:
class Welcome extends React.Component {
  render() {
    return <h1>Hello, {this.props.name}</h1>;
  }
}

const element = <Welcome name="World!" />;

ReactDOM.render(
  element,
  document.getElementById('root')
);
Recommended ordering of methods in class component
- static methods
- constructor()
- getChildContext()
- componentWillMount()
- componentDidMount()
- componentWillReceiveProps()
- shouldComponentUpdate()
- componentWillUpdate()
- componentDidUpdate()
- componentWillUnmount()
- click handlers or event handlers like
onClickSubmit()oronChangeDescription() - getter methods for render like
getSelectReason()orgetFooterContent() - optional render methods like
renderNavigation()orrenderProfilePicture() - render()
Create a dynamic table
/**
 * Generate dynamic table in React
 */
class Table extends React.Component {
   constructor(props) {
      super(props)
      this.state = {
         employees: [
            { id: 10, name: 'Swarna Sachdeva', email: 'swarna@email.com' },
            { id: 20, name: 'Sarvesh Date', email: 'sarvesh@email.com' },
            { id: 30, name: 'Diksha Meka', email: 'diksha@email.com' }
         ]
      }
   }

   renderTableHeader() {
      let header = Object.keys(this.state.employees[0])
      return header.map((key, index) => {
         return <th key={index}>{key.toUpperCase()}</th>
      })
   }

   renderTableData() {
      return this.state.employees.map((employee, index) => {
         const { id, name, email } = employee
         return (
            <tr key={id}>
               <td>{id}</td>
               <td>{name}</td>
               <td>{email}</td>
            </tr>
         )
      })
   }

   render() {
      return (
         <div>
            <h1 id='title'>React Dynamic Table</h1>
            <table id='employees'>
               <tbody>
                  <tr>{this.renderTableHeader()}</tr>
                  {this.renderTableData()}
               </tbody>
            </table>
         </div>
      )
   }
}
Prevent component from rendering
You can prevent component from rendering by returning null based on specific condition. This way it can conditionally render component.
In the example below, the <WarningBanner /> is rendered depending on the value of the prop called warn. If the value of the prop is false, then the component does not render:
function WarningBanner(props) {
  if (!props.warn) {
    return null;
  }

  return (
    <div className="warning">
      Warning!
    </div>
  );
}
class Page extends React.Component {
  constructor(props) {
    super(props);
    this.state = {showWarning: true};
    this.handleToggleClick = this.handleToggleClick.bind(this);
  }

  handleToggleClick() {
    this.setState(state => ({
      showWarning: !state.showWarning
    }));
  }

  render() {
    return (
      <div>
        { /* Prevent component render if value of the prop is false */}
        <WarningBanner warn={this.state.showWarning} />
        <button onClick={this.handleToggleClick}>
          {this.state.showWarning ? 'Hide' : 'Show'}
        </button>
      </div>
    );
  }
}

ReactDOM.render(
  <Page />,
  document.getElementById('root')
);
Set a timer to update every second
Using setInterval() inside React components allows us to execute a function or some code at specific intervals. A function or block of code that is bound to an interval executes until it is stopped. To stop an interval, we can use the clearInterval() method.
Example:
class Clock extends React.Component {
  constructor(props) {
    super(props)
    this.state = {
      time: new Date().toLocaleString()
    }
  }
  componentDidMount() {
    this.intervalID = setInterval(
      () => this.tick(),
      1000
    )
  }
  componentWillUnmount() {
    clearInterval(this.intervalID)
  }
  tick() {
    this.setState({
      time: new Date().toLocaleString()
    })
  }
  render() {
    return (
      <p className="App-clock">
        The time is {this.state.time}.
      </p>
    )
  }
}
Stateful and stateless components
Stateful and stateless components have many different names. They are also known as:
– Container vs Presentational components
– Smart vs Dumb components
The literal difference is that one has state, and the other does not. That means the stateful components are keeping track of changing data, while stateless components print out what is given to them via props, or they always render the same thing.
Example: Stateful/Container/Smart component
class Welcome extends React.Component {
  render() {
    return <h1>This is a React Class Component</h1>;
  }
}
Example: Stateless/Presentational/Dumb component
function welcome(props) {
  return <h1>This is a React Functional Component</h1>;
}
| Class Components | Functional Components |
|---|---|
| Class components need to extend the component from “React.Component” and create a render function that returns the required element. | Functional components are like normal functions which take “props” as the argument and return the required element. |
| They are also known as stateful components. | They are also known as stateless components. |
| They implement logic and the state of the component. | They accept some kind of data and display it in the UI. |
| Lifecycle methods can be used inside them. | Lifecycle methods cannot be used inside them. |
| It needs to store state therefore constructors are used. | Constructors are not used in it. |
| It has to have a “render()” method inside that. | It does not require a render method. |
Purpose of using super constructor with props argument
The super() keyword is used to call the parent constructor. super(props) would pass props to the parent constructor.
/**
 * super constructor
 */
class App extends React.Component {
  constructor(props) {
      super(props)
      this.state = {}
   }

  // React says we have to define render()
  render() {
    return <div>Hello world</div>
  }
}

export default App
Here, super(props) would call the React.Component constructor passing in props as the argument.
Element, Component and Component instance
1. React Elements:
A React Element is just a plain old JavaScript Object without own methods. It has essentially four properties:
- type: a String representing an HTML tag or a reference referring to a React Component
- key: a String to uniquely identify an React Element
- ref: a reference to access either the underlying DOM node or React Component Instance)
- props: (properties Object)
A React Element is not an instance of a React Component. It is just a simplified “description” of how the React Component Instance to be created should look like.
2. React Components and React Component Instances:
A React Component is used by extending React.Component. If a React Component is instantiated it expects a props Object and returns an instance, which is referred to as a React Component Instance.
A React Component can contain state and has access to the React Lifecycle methods. It must have at least a render method, which returns a React Element(-tree) when invoked.
Example:
/**
 * React Component Instances
 */
import React from 'react'
import ReactDOM from 'react-dom'

class MyComponent extends React.Component {
  constructor(props) {
    super(props)
    console.log('This is a component instance:' + this)
  }

  render() {
    const another_element = <div>Hello, World!</div>
    console.log('This is also an element:' + another_element)
    return another_element
  }
}

console.log('This is a component:' + MyComponent)

const element = <MyComponent/>
console.log('This is an element:' + element)

ReactDOM.render(element, document.getElementById('root'));
What does shouldComponentUpdate do and why is it important
The shouldComponentUpdate() method allows Component to exit the Update life cycle if there is no reason to apply a new render. React does not deeply compare props by default. When props or state is updated React assumes we need to re-render the content.
The default implementation of this function returns true so to stop the re-render you need to return false here:
shouldComponentUpdate(nextProps, nextState) {
  console.log(nextProps, nextState)
  console.log(this.props, this.state)
  return false
}
Preventing unnecessary renders:
The shouldComponentUpdate() method is the first real life cycle optimization method that we can leverage in React. It checks the current props and state, compares it to the next props and state and then returns true if they are different, or false if they are the same. This method is not called for the initial render or when forceUpdate() is used.
Purpose of render() function
The React class components uses render() function. It is used to update the UI.
Purpose of render():
- React renders HTML to the web page by using a function called render().
- The purpose of the function is to display the specified HTML code inside the specified HTML element.
- In the render() method, we can read props and state and return our JSX code to the root component of our app.
- In the render() method, we cannot change the state, and we cannot cause side effects ( such as making an HTTP request to the webserver).
/**
 * render() function
 *
 * React v18.0.0
 */
import React from "react";
import { createRoot } from "react-dom/client";

class App extends React.Component {
  render() {
    return <h1>Render() Method Example</h1>;
  }
}

const container = document.getElementById("root");
const root = createRoot(container);
root.render(<App />);
REACT LIFECYCLE
Different phases of React component lifecycle
React provides several methods that notify us when certain stage of this process occurs. These methods are called the component lifecycle methods and they are invoked in a predictable order. The lifecycle of the component is divided into four phases.
1. Mounting:
These methods are called in the following order when an instance of a component is being created and inserted into the DOM:
constructor()getDerivedStateFromProps()render()componentDidMount()
2. Updating:
The next phase in the lifecycle is when a component is updated. A component is updated whenever there is a change in the component's state or props.
React has five built-in methods that gets called, in this order, when a component is updated:
getDerivedStateFromProps()shouldComponentUpdate()render()getSnapshotBeforeUpdate()componentDidUpdate()
3. Unmounting:
The next phase in the lifecycle is when a component is removed from the DOM, or unmounting as React likes to call it.
componentWillUnmount()
Make component to perform an action only once when the component initially rendered
1. Using Class Component:
The componentDidMount() lifecycle hook can be used with class components. Any actions defined within a componentDidMount() lifecycle hook are called only once when the component is first mounted.
Example:
class Homepage extends React.Component {
  componentDidMount() {
    trackPageView('Homepage')
  }
  render() {
    return <div>Homepage</div>
  }
}
2. Using Function Component:
The useEffect() hook can be used with function components. The useEffect() hook is more flexible than the lifecycle methods used for class components. It receives two parameters:
- The first parameter it takes is a callback function to be executed.
- The optional second parameter it takes is an array containing any variables that are to be tracked.
The value passed as the second argument controls when the callback is executed:
- If the second parameter is undefined, the callback is executed every time that the component is rendered.
- If the second parameter contains an array of variables, then the callback will be executed as part of the first render cycle and will be executed again each time an item in the array is modified.
- If the second parameter contains an empty array, the callback will be executed only once as part of the first render cycle.
Example:
const Homepage = () => {
  useEffect(() => {
    trackPageView('Homepage')
  }, [])

  return <div>Homepage</div>
}
Rendering a list of components from an array of data
The usual pattern for rendering lists of components often ends with delegating all of the responsibilities of each child component to the entire list container component. But with a few optimizations, we can make a change in a child component not cause the parent component to re-render.
Example: using custom shouldComponentUpdate()
/**
 * shouldComponentUpdate()
 */
class AnimalTable extends React.Component<Props, never> {
  shouldComponentUpdate(nextProps: Props) {
    return !nextProps.animalIds.equals(this.props.animalIds);
  }
  ...
Here, shouldComponentUpdate() will return false if the props its receiving are equal to the props it already has. And because the AnimalTable is receiving just a List of string IDs, a change in the adoption status won't cause AnimalTable to receive a different set of IDs.
useEffect() vs componentDidMount()
In react when we use class based components we get access to lifecycle methods ( like componentDidMount(), `componentDidUpdate(), etc ). But when we want use a functional component and also we want to use lifecycle methods, then using useEffect() we can implement those lifecycle methods.
1. componentDidMount():
The componentDidMount() and useEffect() run after the mount. However useEffect() runs after the paint has been committed to the screen as opposed to before. This means we would get a flicker if needed to read from the DOM, then synchronously set state to make new UI.
The useLayoutEffect() was designed to have the same timing as componentDidMount(). So useLayoutEffect(fn, []) is a much closer match to componentDidMount() than useEffect(fn, []) – at least from a timing standpoint.
/**
 * componentDidMount() in Class Component
 */
import React, { Component } from "react";

export default class SampleComponent extends Component {
  componentDidMount() {
    // code to run on component mount
  }
  render() {
    return <>componentDidMount Example</>;
  }
}
2. useEffect():
/**
 * useEffect() in Functional Component
 */
import React, { useEffect } from "react";

const SampleComponent = () => {
  useEffect(() => {
    // code to run on component mount
  }, []);
  return <>useEffect Example</>;
};
export default SampleComponent;
When useEffect() is used to get data from server.
- The first argument is a callback that will be fired after browser layout and paint. Therefore it does not block the painting process of the browser.
- The second argument is an array of values (usually props).
- If any of the value in the array changes, the callback will be fired after every render.
- When it is not present, the callback will always be fired after every render.
- When it is an empty list, the callback will only be fired once, similar to componentDidMount.
component constructor called only once?
React's reconciliation algorithm assumes that without any information to the contrary, if a custom component appears in the same place on subsequent renders, it's the same component as before, so reuses the previous instance rather than creating a new one.
If you give each component a unique key prop, React can use the key change to infer that the component has actually been substituted and will create a new one from scratch, giving it the full component lifecycle.
renderContent() {
  if (this.state.activeItem === 'item-one') {
    return (
      <Content title="First" key="first" />
    )
  } else {
    return (
      <Content title="Second" key="second" />
    )
  }
}
componentDidMount() and componentWillMount()
componentDidMount():
The componentDidMount() is executed after the first render only on the client side. This is where AJAX requests and DOM or state updates should occur. This method is also used for integration with other JavaScript frameworks and any functions with delayed execution such as setTimeout() or setInterval().
Example:
import React, { Component } from 'react'

class App extends Component {

  constructor(props) {
    super(props)
    this.state = {
      data: 'Alex Belfort'
    }
  }

  getData(){
    setTimeout(() => {
      console.log('Our data is fetched')
      this.setState({
        data: 'Hello Alex'
      })
    }, 1000)
  }

  componentDidMount() {
    this.getData()
  }

  render() {
    return (
      <div>
        {this.state.data}
      </div>
    )
  }
}

export default App
componentWillMount():
The componentWillMount() method is executed before rendering, on both the server and the client side. componentWillMount() method is the least used lifecycle method and called before any HTML element is rendered. It is useful when we want to do something programatically right before the component mounts.
Example:
import React, { Component } from 'react'

class App extends Component {

  constructor(props) {
    super(props)
    this.state = {
      data: 'Alex Belfort'
    }
  }
  componentWillMount() {
    console.log('First this called')
  }

  getData() {
    setTimeout(() => {
      console.log('Our data is fetched')
      this.setState({
        data: 'Hello Alex'
      })
    }, 1000)
  }

  componentDidMount() {
    this.getData()
  }

  render() {
    return (
      <div>
        {this.state.data}
      </div>
    )
  }
}

export default App
Good to use setState() in componentWillMount() method?
Avoid async initialization in componentWillMount().
componentWillMount() is invoked immediately before mounting occurs. It is called before render(), therefore setting state in this method will not trigger a re-render. Avoid introducing any side-effects or subscriptions in this method.
Make async calls for component initialization in componentDidMount() instead of componentWillMount()
function componentDidMount() {
  axios.get(`api/messages`)
    .then((result) => {
      const messages = result.data
      console.log("COMPONENT WILL Mount messages : ", messages);
      this.setState({
        messages: [...messages.content]
      })
    })
}
componentWillUnmount() with Functional Components
The useEffect() can be used to manage API calls, as well as implementing componentWillMount(), and componentWillUnmount().
If we pass an empty array as the second argument, it tells useEffect to fire on component load. This is the only time it will fire.
import React, { useEffect } from 'react';

const ComponentExample => () => {
   useEffect( () => {
      // Anything in here is fired on component mount.
   }, []);
}
If you add a return function inside the useEffect() function, it is triggered when a component unmounts from the DOM.
import React, { useEffect } from 'react';

const ComponentExample => () => {
    useEffect(() => {
        return () => {
            // Anything in here is fired on component unmount.
        }
    }, [])
}
Pure Components
Pure Components in React are the components which do not re-renders when the value of state and props has been updated with the same values. Pure Components restricts the re-rendering ensuring the higher performance of the Component.
Features of React Pure Components:
- Prevents re-rendering of Component if props or state is the same
- Takes care of
shouldComponentUpdate()implicitly State()andPropsare Shallow Compared- Pure Components are more performant in certain cases
Example:
/**
 * React Pure Component
 */
import React from "react";

export default class App extends React.PureComponent {
  constructor() {
    super();
    this.state = {
      userArray: [1, 2, 3, 4, 5]
    };
    // Here we are creating the new Array Object during setState using "Spread" Operator
    setInterval(() => {
      this.setState({
        userArray: [...this.state.userArray, 6]
      });
    }, 1000);
  }

  render() {
    return <b>Array Length is: {this.state.userArray.length}</b>;
  }
}
Pure Component vs Component
PureComponent is exactly the same as Component except that it handles the shouldComponentUpdate() method. The major difference between React.PureComponent and React.Component is PureComponent does a shallow comparison on state change. It means that when comparing scalar values it compares their values, but when comparing objects it compares only references. It helps to improve the performance of the app.
A component rerenders every time its parent rerenders, regardless of whether the component's props and state have changed. On the other hand, a pure component will not rerender if its parent rerenders, unless the pure component's props (or state) have changed.
When to use React.PureComponent:
- State/Props should be an immutable object
- State/Props should not have a hierarchy
- We should call forceUpdate when data changes
Example:
// Regular class component
class App extends React.Component {
  render() {
    return <h1>Component Example !</h1>
  }
}

// React Pure class component
class Message extends React.Component {
  render() {
    return <h1>PureComponent Example !</h1>
  }
}
Problems of using render props with PureComponent
If you create a function inside a render method, it negates the purpose of pure component. Because the shallow prop comparison will always return false for new props, and each render in this case will generate a new value for the render prop. You can solve this issue by defining the render function as instance method.
Example:
class Mouse extends React.PureComponent {
  // Mouse Component...
}

class MouseTracker extends React.Component {
  // Defined as an instance method, `this.renderTheCat` always
  // refers to *same* function when we use it in render
  renderTheCat(mouse) {
    return <Cat mouse={mouse} />;
  }

  render() {
    return (
      <div>
        <h1>Move the mouse around!</h1>
        {/* define the render function as instance method */}
        <Mouse render={this.renderTheCat} />
      </div>
    );
  }
}
When to use PureComponent over Component
- We want to avoid re-rendering cycles of component when its props and state are not changed
- The state and props of component are immutable
- We do not plan to implement own
shouldComponentUpdate()lifecycle method.
On the other hand, we should not use PureComponent() as a base component if:
- props or state are not immutable
- Plan to implement own
shouldComponentUpdate()lifecycle method.
Higher Order Components HOC
A Higher-Order Component(HOC) is a function that takes a component and returns a new component. It is the advanced technique in React.js for reusing a component logic.
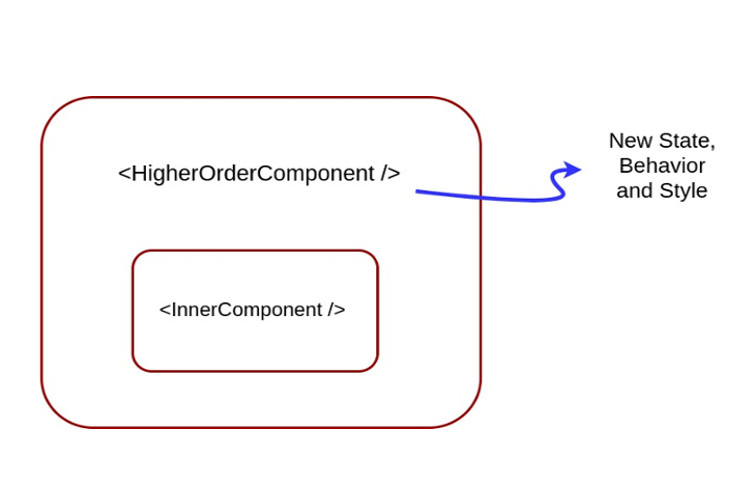
Higher-Order Components are not part of the React API. They are the pattern that emerges from React's compositional nature. The component transforms props into UI, and a higher-order component converts a component into another component. The examples of HOCs are Redux's connect and Relay's createContainer.
/**
 * Higher Order Component
 */
import React, { Component } from "react";

export default function Hoc(HocComponent) {
  return class extends Component {
    render() {
      return (
        <div>
          <HocComponent></HocComponent>
        </div>
      );
    }
  };
}
/**
 * App.js
 */
import React, { Component } from "react";
import Hoc from "./HOC";

export default class App extends Component {
  render() {
    return <h2>Higher Order Component!</h2>;
  }
}
App = Hoc(App);
Note:
- A HOC does not modify or mutate components. It creates a new one.
- A HOC is used to compose components for code reuse.
- A HOC is a pure function. It has no side effects, returning only a new component.
Benefits of using HOC
Benefits:
- Importantly they provided a way to reuse code when using ES6 classes.
- No longer have method name clashing if two HOC implement the same one.
- It is easy to make small reusable units of code, thereby supporting the single responsibility principle.
- Apply multiple HOCs to one component by composing them. The readability can be improve using a compose function like in Recompose.
Problems:
- Boilerplate code like setting the displayName with the HOC function name e.g. (
withHOC(Component)) to help with debugging. - Ensure all relevant props are passed through to the component.
- Hoist static methods from the wrapped component.
- It is easy to compose several HOCs together and then this creates a deeply nested tree making it difficult to debug.
Higher Order Component factory implementations
Creating a higher order component basically involves manipulating WrappedComponent which can be done in two ways:
- Props Proxy
- Inheritance Inversion
Both enable different ways of manipulating the WrappedComponent.
1. Props Proxy:
In this approach, the render method of the HOC returns a React Element of the type of the WrappedComponent. We also pass through the props that the HOC receives, hence the name Props Proxy.
Example:
function ppHOC(WrappedComponent) {
   return class PP extends React.Component {
     render() {
       return <WrappedComponent {...this.props}/>
     }
   }
}
Props Proxy can be implemented via a number of ways
- Manipulating props
- Accessing the instance via Refs
- Abstracting State
- Wrapping the WrappedComponent with other elements
2. Inheritance Inversion:
Inheritance Inversion allows the HOC to have access to the WrappedComponent instance via this keyword, which means it has access to the state, props, component lifecycle hooks and the render method.
Example:
function iiHOC(WrappedComponent) {
   return class Enhancer extends WrappedComponent {
     render() {
       return super.render()
     }
   }
}
Inheritance Inversion can be used in:
- Conditional Rendering (Render Highjacking)
- State Manipulation
Inheritance Inversion (iiHOC)
Inheritance Inversion gives the HOC access to the WrappedComponent instance via this, which means we can use the state, props, component lifecycle and even the render method.
Example:
/**
 * Inheritance Inversion
 */
class Welcome extends React.Component {
  render() {
    return (
      <div> Welcome {his.props.user}</div>
    )
  }
}

const withUser = (WrappedComponent) => {
  return class extends React.Component {
    render() {
      if(this.props.user) {
        return  (
          <WrappedComponent {...this.props} />
        )
      }
      return <div>Welcome Guest!</div>
    }
  }
}

const withLoader = (WrappedComponent) => {
  return class extends WrappedComponent {
    render() {
      const { isLoader } = this.props
      if(!isLoaded) {
        return <div>Loading...</div>
      }
      return super.render()
    }
  }
}

export default withLoader(withUser(Welcome))
Create props proxy for Higher Order Component component
It's nothing more than a function, propsProxyHOC, that receives a Component as an argument (in this case we've called the argument WrappedComponent) and returns a new component with the WrappedComponent within.
When we return the Wrapped Component we have the possibility to manipulate props and to abstract state, even passing state as a prop into the Wrapped Component.
We can create props passed to the component using props proxy pattern as below
const propsProxyHOC = (WrappedComponent) => {

  return class extends React.Component {
    render() {
      const newProps = {
        user: currentLoggedInUser
      }

      return <WrappedComponent {...this.props} {...newProps} />
    }
  }
}
Props Proxy HOCs are useful to the following situations:
- Manipulating props
- Accessing the instance via Refs (be careful, avoid using refs)
- Abstracting State
- Wrapping/Composing the WrappedComponent with other elements
Use decorators in React
Decorators provide a way of calling Higher-Order functions. It simply take a function, modify it and return a new function with added functionality. The key here is that they don't modify the original function, they simply add some extra functionality which means they can be reused at multiple places.
Example:
export const withUniqueId = (Target) => {
  return class WithUniqueId extends React.Component {
    uid = uuid();

    render() {
      return <Target {...this.props} uuid={this.uid} />;
    }
  };
}
@withUniqueId
class UniqueIdComponent extends React.Component {
  render() {
    return <div>Generated Unique ID is: {this.props.uuid}</div>;
  }
}

const App = () => (
  <div>
    <h2>Decorators in React!</h2>
    <UniqueIdComponent />
  </div>
);
Note: Decorators are an experimental feature in React that may change in future releases.
Purpose of displayName class property
The displayName string is used in debugging messages. Usually, you don't need to set it explicitly because it's inferred from the name of the function or class that defines the component. You might want to set it explicitly if you want to display a different name for debugging purposes or when you create a higher-order component.
Example:
function withSubscription(WrappedComponent) {

  class WithSubscription extends React.Component {/* ... */}

  WithSubscription.displayName = `WithSubscription(${getDisplayName(WrappedComponent)})`;
  return WithSubscription;
}

function getDisplayName(WrappedComponent) {
  return WrappedComponent.displayName || WrappedComponent.name || 'Component';
}
Lazy Loading
Set up lazy loading components
1. REACT.LAZY():
React.lazy is a function that lets you load components lazily through what is called code splitting without help from any external libraries. It makes possible for us to dynamically import components but they are rendered like regular components. This means that the bundle containing the component will only be loaded when the component is rendered.
React.lazy() takes a function that returns a promise as it's argument, the function returns a promise by calling import() to load the content. The returned Promise resolves to a module with a default containing the React Component.
// Without Lazy
import MyComponent from './MyComponent';

// With Lazy
const MyComponent = React.lazy(() => import('./MyComponent'));
2. SUSPENSE:
React.Suspense is a component that can be used to wrap lazy components. A React.Suspense takes a fallback prop that can be any react element, it renders this prop as a placeholder to deliver a smooth experience and also give user feedback while the lazy component is being loaded.
/**
 * Suspense
 */
import React, { Suspense } from 'react';

const MyComponent = React.lazy(() => import('./MyComponent'));

const App = () => {
  return (
    <div>
      <Suspense fallback={<div>Loading ... </div>}>
        <MyComponent />
      </Suspense>
    </div>
  );
}
Example:
/**
 * React Lazy Loading Routes
 */
import React, { Suspense, lazy } from "react";
import { Switch, BrowserRouter as Router, Route, Link } from "react-router-dom";

const Home = lazy(() => import("./Home"));
const ContactUs = lazy(() => import("./ContactUs"));
const HelpPage = lazy(() => import("./Help"));

export default function App() {
  return (
      <Router>
        <ul>
          <li><Link to="/">Home</Link></li>
          <li><Link to="/contact-us">ContactUs</Link></li>
          <li><Link to="/help">HelpPage</Link></li>
        </ul>
        <hr />
        <Suspense fallback={<h1>Loading...</h1>}>
          <Switch>
            <Route exact component={Home} path="/" />
            <Route component={ContactUs} path="/contact-us" />
            <Route component={HelpPage} path="/help" />
          </Switch>
        </Suspense>
      </Router>
  );
}